Simple compiler to convert text to event.
![]()
![]()
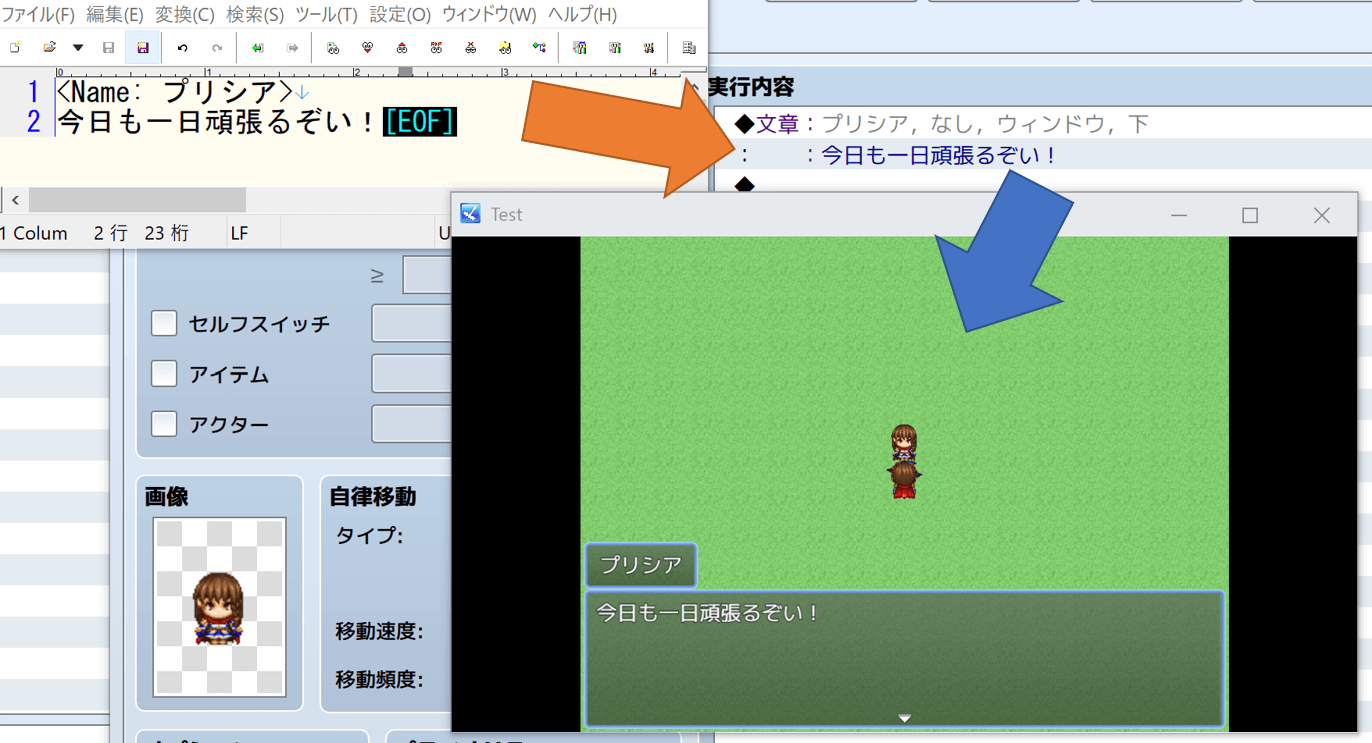
テキストファイル(.txtファイルなど)から「文章の表示」イベントコマンドに簡単に変換するための、RPGツクールMV・MZ用の開発支援プラグインです。

会話などをツクールMV・MZ以外のエディタで編集して、あとでイベントコマンドとして組み込みたい人をサポートします。
プラグインコマンドを実行すると、テキストファイルを読み込み、ツクールMV・MZのマップイベントまたはコモンイベントにイベントコマンドとして取り込むことができます。
これによりツクール上でセリフ、ウインドウの表示方法(表示位置、背景)、BGMの編集などをする必要がなくなります。
最も基本的な使い方は、以下のデモを見てください。 高度な使い方やプラグインパラメータの詳細はwikiを参照してください。
デモ/Quick Start
- シナリオファイルを作成します
- text/message.txtとして保存します
- プラグインコマンドを実行するイベントを作成します
- プラグインコマンドを設定します
- 書き出し先のイベントを作成します
- プラグインコマンドをテストで実行します
- プロジェクトをリロードするか、開き直します
より詳細な手順はwikiを参照してください。
- ここから Text2Frame.js をダウンロードします。
- 導入したいプロジェクトのプラグインフォルダに入れます。
- プラグインエディターからText2Frameのプラグインを有効にします。
タグを使って、顔・背景・位置等のメッセージの設定を変更することができます。 これらのデフォルト値は、プラグインのオプションから変更することができます。
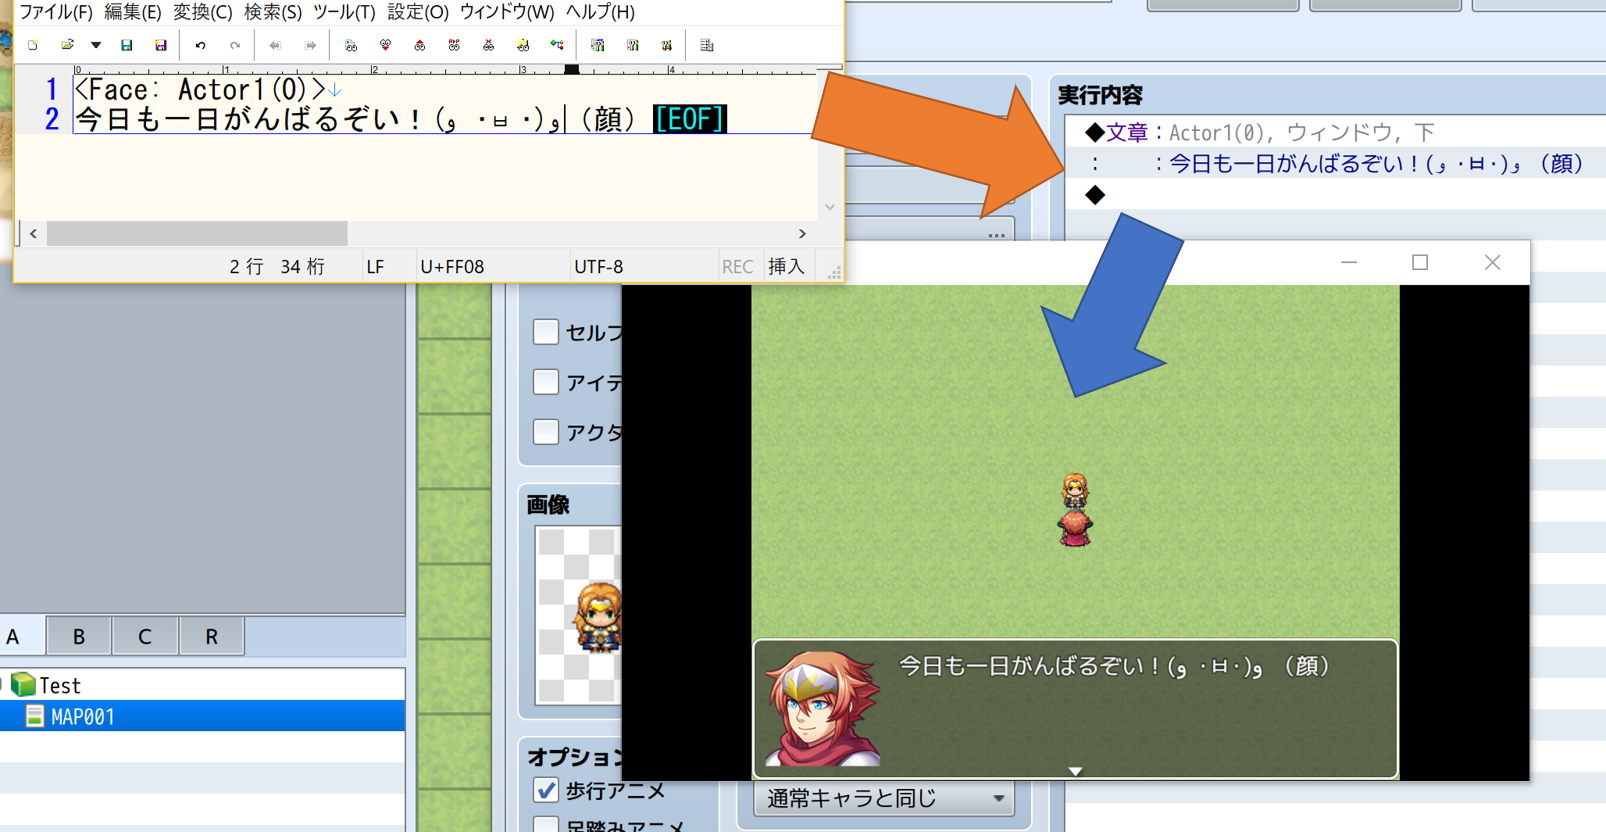
ウインドウに表示される顔を指定することができます。
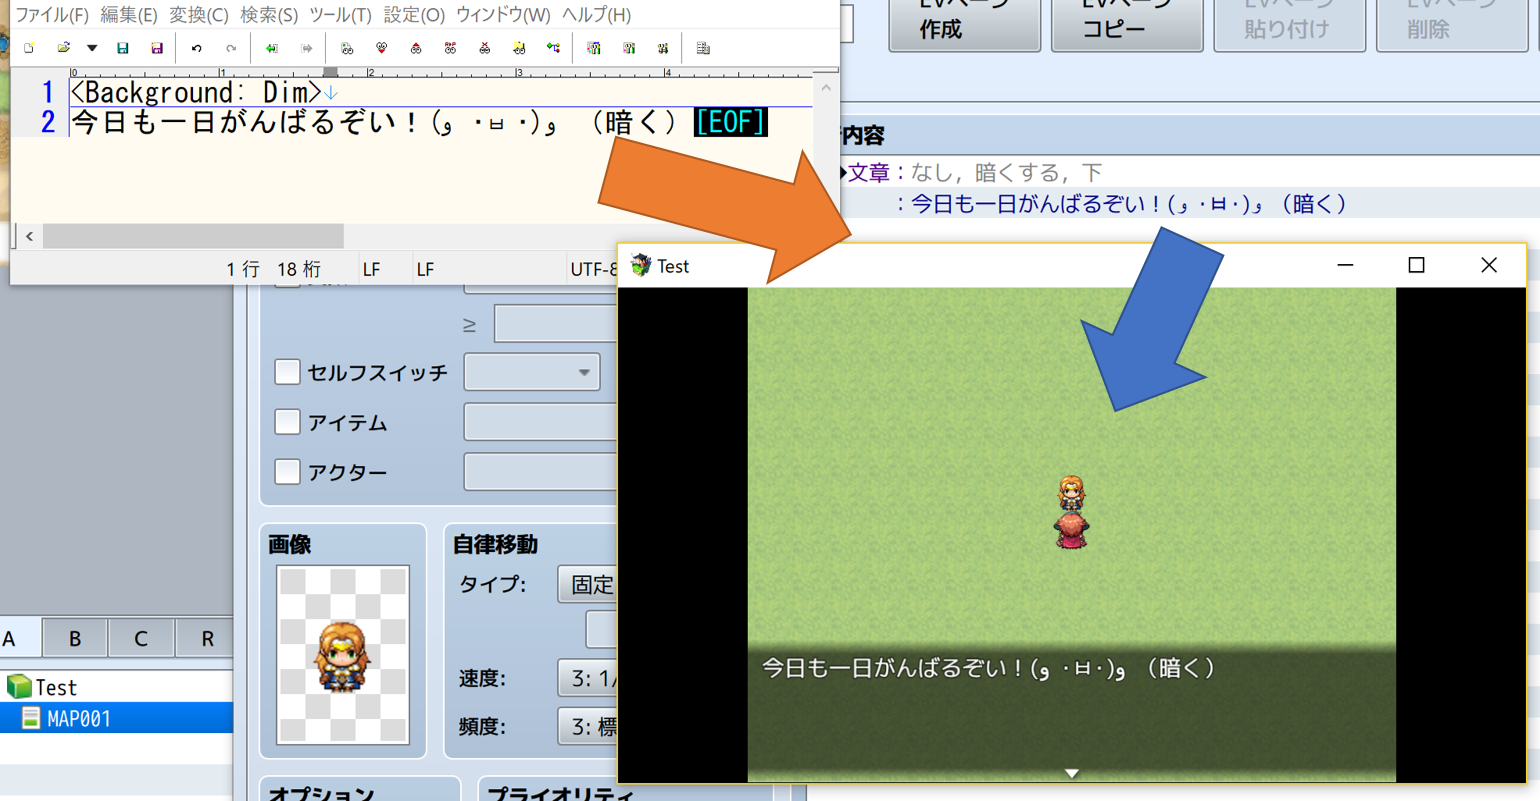
ウインドウの背景を変更することができます。
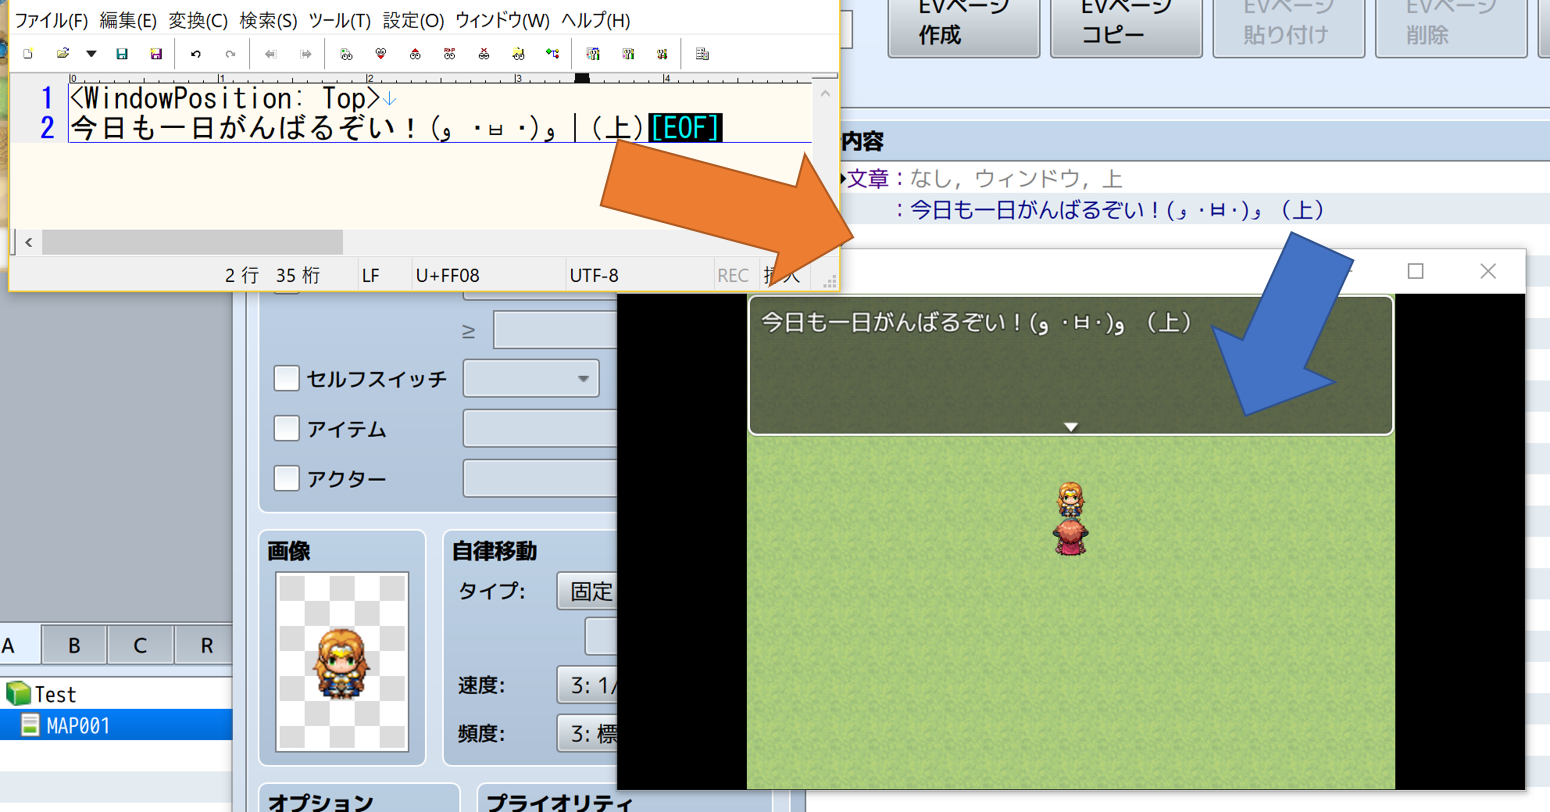
ウインドウの位置を変更することができます。
ウィンドウに表示される名前を指定することができます。
「文章の表示」以外にも、他のすべてのイベントコマンドにも対応しています。 以下のタグをメッセージの間に挟むことで、そのタグがイベントコマンドに置き換わります。 例えば、
<Set: 1, 2>
<CommonEvent: 3>
今日も一日がんばるぞい!
とすることで、「今日も一日がんばるぞい!」というメッセージの前に、「変数の操作(変数1に定数2を代入する)」と「コモンイベント(ID3)」のイベントコマンドが組み込まれます。
全てのタグの詳細はwikiの文法ページや プラグイン本体のヘルプ文に記載しています。
以下に、よく使われるイベントコマンドに絞って早見表を記載しています。ここに記載しているもの以外にも、すべてのイベントコマンドに対応しています。
| イベントコマンド | タグ | 詳細 |
|---|---|---|
| 選択肢の表示 | <ShowChoices> <When: はい> 選択肢1を選んだ時の処理 <When: いいえ> 選択肢2を選んだ時の処理 <End> |
「はい」と「いいえ」の選択肢を表示する。 |
| スイッチの操作(ON) | <Switch: 1, ON> | スイッチ1をONにする。 |
| スイッチの操作(OFF) | <Switch: 1, OFF> | スイッチ1をOFFにする。 |
| 変数の操作(代入) | <Set: 1, 2> | 変数1に定数2を代入する。 |
| 変数の操作(加算) | <Add: 1, V[20]> | 変数1に変数20の値を加算する。 |
| 変数の操作(減算) | <Sub: 1, R[50][100]> | 変数1に最小値50最大値50の乱数を減算する。 |
| 変数の操作(乗算) | <Mul: 1-10, GD[Item][2]> | 変数1~10にID2のアイテムの所持数を乗算する。 |
| 変数の操作(除算) | <Div: 1, GD[BattleCount]> | 変数1に戦闘回数を除算する。 |
| 変数の操作(剰余) | <Mod: 1-10, SC[$dataMap.width;]> | 変数1〜10に"$dataMap.width"の値の剰余を代入する。 |
| セルフスイッチの操作(ON) | <SelfSwitch: A, ON> | セルフスイッチAをONにする。 |
| セルフスイッチの操作(OFF) | <SelfSwitch: A, OFF> | セルフスイッチAをOFFにする。 |
| 条件分岐 | <If: Switch[1], ON> 条件を満たしている時の処理 <Else> 条件を満たしていない時の処理 <End> |
「スイッチ1がONの場合」という条件で処理を分岐する。 |
| ループ | <Loop> ループしたい処理 <RepeatAbove> |
処理をループする。 |
| ループの中断 | <BreakLoop> | ループ処理を該当箇所で中断する。 |
| コモンイベント | <CommonEvent: 1> | ID1のコモンイベントを挿入する。 |
| ラベルを設定する | <Label: サンプル> | "サンプル"というラベルを設定する。 |
| ラベルジャンプ | <JumpToLabel: サンプル> | "サンプル"というラベルへ処理をジャンプする。 |
| 注釈 | <comment> 今日も一日がんばるぞい! </comment> |
"今日も一日がんばるぞい!"という注釈を挿入する。 |
| 所持金の増減 | <ChangeGold: Increase, 100> | 所持金を100増やす。 |
| アイテムの増減 | <ChangeItems: 3, Increase, 4> | IDが3のアイテムを4つ増やす。 |
| 武器の増減 | <ChangeWeapons: 1, Increase, 2> | IDが1の武器を2つ増やす。 |
| 防具の増減 | <ChangeArmors: 1, Increase, 2> | IDが1の防具を2つ増やす。 |
| 場所移動 | <TransferPlayer: Direct[1][10][20], Retain, Black> | 向きがそのままで、フェードが黒で、IDが1のマップのX座標10,Y座標20に移動。 |
| ピクチャの表示 | <ShowPicture: 1, Castle, Scale[50][55]> | 幅50%, 高さ55%でCastle.pngの番号1の画像を表示する。 |
| ピクチャの移動 | <MovePicture: 1, Position[Center][200][Variables[3]]> | 原点は中央で、X座標は200,Y座標は変数3の位置に番号1の画像を移動する。 |
| ピクチャの回転 | <RotatePicture: 1, -30> | 速度が-30で番号1のピクチャを回転する |
| ピクチャの色調変更 | <TintPicture: 1, Duration[60], ColorTone[0][100][255][50]> | 赤0, 緑100, 青255, グレイ50に、60フレーム(1秒)かけて番号1のピクチャの色調を変更する。 |
| ピクチャの消去 | <ErasePicture: 1> | 番号1のピクチャを削除する。 |
| ウェイト | <Wait: 60> | 60フレーム(1秒)のウェイトを挿入する。 |
| 画面のフェードアウト | <FadeOut> | 画面のフェードアウトを挿入する。 |
| 画面のフェードイン | <FadeIn> | 画面のフェードインを挿入する。 |
| 画面の色調変更 | <TintScreen: Duration[60], ColorTone[0][100][255][50]> | 赤0, 緑100, 青255, グレイ50に、60フレーム(1秒)かけて画面の色調を変更する。 |
| 画面のフラッシュ | <FlashScreen: 50, 100, 150, 170, 60> | 赤50, 緑100, 青150, 強さ170で60フレーム(1秒)かけてフラッシュする。 |
| 画面のシェイク | <ShakeScreen: 5, 8, 60> | 強さ5、速さ8で60フレームかけて画面をシェイクする。 |
| BGMの演奏 | <PlayBGM: Battle1, 90, 100, 0> | BGMをBattle1に、音量90,ピッチ100, 位相0で変更する。 |
| BGMのフェードアウト | <FadeoutBGM: 10> | 10秒かけてBGMをフェードアウトする。 |
| BGSの演奏 | <PlayBGS: City, 90, 100, 0> | BGSをCityに、音量90,ピッチ100, 位相0で変更する。 |
| BGSのフェードアウト | <FadeoutBGS: 20> | 10秒かけてBGSをフェードアウトする。 |
| MEの演奏 | <PlayME: Curse1, 90, 100, 0> | Curse1をMEとして、音量90,ピッチ100, 位相0で演奏する。 |
| SEの演奏 | <PlaySE: Attack1, 90, 100, 0> | Attack1をSEとして、音量90,ピッチ100, 位相0で演奏する。 |
| SEの停止 | <StopSE> | SEの停止イベントを挿入する。 |
| 戦闘の処理 | <BattleProcessing: 1> | 敵グループ1と戦闘する。 |
| 戦闘の処理(負けイベント) | <BattleProcessing: 1> <IfWin> 勝利した時の処理 <IfLose> 敗北したときの処理 <End> |
敵グループ1と敗北可能でエンカウント。 |
| セーブ画面を開く | <OpenSaveScreen> | セーブ画面を開く。 |
| スクリプト | <script> console.log("ぞい!"); </script> |
"console.log("ぞい!");"をスクリプトイベントとして組み込む。 |
| プラグインコマンド | <PluginCommand: IMPORT_MESSAGE_TO_EVENT> | "IMPORT_MESSAGE_TO_EVENT"をプラグインコマンドとして組み込む。 |
より具体的かつその他のイベントコマンドのサンプルは、動作確認用テキスト文例ページを参照してください。
取り込みたい文章の行の先頭に「%」を記載すると、それはコメントと見なされ、取り込まれません。 このコメントアウト記号はプラグインパラメータで変更することができます。 動作例はwikiの該当ページを参照してください。
マップ上のイベントへの書き出しだけでなく、コモンイベントへも書き出すことができます。 動作例はwikiの該当ページを参照してください。
読み込みたいファイルが複数あるときやファイルごとに異なるオプションを適用したいときなどに、プラグインコマンド引数を使うことでより高度な制御が行えます。 この機能はツクールMV用です。ツクールMZではプラグインコマンドから直接設定できます。
詳細はwikiの該当ページを参照してください。
RPGツクールMV/MZのイベントコマンドを、Text2Frameの記法に則ったテキストにエクスポートするプラグインである、Frame2Textも公開しています。
Frame2Textのダウンロードはここからお願いします。
また、詳細な使い方はFrame2Textの紹介ページかプラグイン本体のヘルプドキュメントを参照してください。
- @Asyun3i9t
- inazumasoft:Shick
$ npm ci
$ npm run build --if-present
Usage: Text2Frame [options]

Options:
  -V, --version                         output the version number
  -m, --mode <map|common|compile|test>  output mode
  -t, --text_path <name>                text file path
  -o, --output_path <name>              output file path
  -e, --event_id <name>                 event file id
  -p, --page_id <name>                  page id
  -c, --common_event_id <name>          common event id
  -w, --overwrite <true/false>          overwrite mode (default: "false")
  -v, --verbose                         debug mode (default: false)
  -h, --help                            display help for command

===== Manual =====
    NAME
       Text2Frame - Simple compiler to convert text to event command.
    SYNOPSIS
        node Text2Frame.js --verbose --mode map --text_path <text file path> --output_path <output file path> --event_id <event id> --page_id <page id> --overwrite <true|false>
        node Text2Frame.js --verbose --mode common --text_path <text file path> --common_event_id <common event id> --overwrite <true|false>
        node Text2Frame.js --mode compile
        node Text2Frame.js --verbose --mode test
    DESCRIPTION
        node Text2Frame.js --verbose --mode map --text_path <text file path> --output_path <output file path> --event_id <event id> --page_id <page id> --overwrite <true|false>
          マップへのイベント出力モードです。
          読み込むファイル、出力マップ、上書きの有無を引数で指定します。
          test/basic.txt を読み込み data/Map001.json に上書きするコマンド例は以下です。

          例1:$ node Text2Frame.js --mode map --text_path test/basic.txt --output_path data/Map001.json --event_id 1 --page_id 1 --overwrite true
          例2:$ node Text2Frame.js -m map -t test/basic.txt -o data/Map001.json -e 1 -p 1 -w true

        node Text2Frame.js --verbose --mode common --text_path <text file path> --common_event_id <common event id> --overwrite <true|false>
          コモンイベントへのイベント出力モードです。
          読み込むファイル、出力コモンイベント、上書きの有無を引数で指定します。
          test/basic.txt を読み込み data/CommonEvents.json に上書きするコマンド例は以下です。

          例1:$ node Text2Frame.js --mode common --text_path test/basic.txt --output_path data/CommonEvents.json --common_event_id 1 --overwrite true
          例2:$ node Text2Frame.js -m common -t test/basic.txt -o data/CommonEvents.json -c 1 -w true

        node Text2Frame.js --mode compile
          コンパイルモードです。
          変換したいテキストファイルをパイプで与えると、対応したイベントに変換されたJSONを、標準出力に出力します。
          このモードでは、Map.json / CommonEvent.jsonの形式へフォーマットされず、イベントに変換したJSONのみが出力されるため、
          Map.json/CommonEvent.json への組み込みは各自で行う必要があります。

          例1: $ cat test/basic.txt | node Text2Frame.js --mode compile

        node Text2Frame.js --mode test
          テストモードです。test/basic.txtを読み込み、data/Map001.jsonに出力します。
$ npm run debug -- --mode map --text_path test/basic.txt --output_path data/Map001.json --event_id 1 --overwrite true

> [email protected] debug /home/yuki/github/Text2Frame-MV
> node Text2Frame.js "--mode" "map" "--text_path" "test/basic.txt" "--output_path" "data/Map001.json" "--event_id" "1" "--overwrite" "true"

Please restart RPG Maker MV(Editor) WITHOUT save.
**セーブせずに**プロジェクトファイルを開き直してください
Text2FrameはNode.jsプロジェクトでライブラリとして使用することができます。 CommonJS形式とES Module形式の両方をサポートしているため、プロジェクトの環境に合わせて選択できます。
npmを使用してGitHubリポジトリから直接インストールできます:
$ npm install 'yktsr/Text2Frame-MV'または、package.jsonに以下を追加してください:
{
  "dependencies": {
    "Text2Frame-MV": "yktsr/Text2Frame-MV"
  }
}Node.jsの従来のrequire構文を使用する場合は、.cjs.jsファイルをインポートします。
examples/commonjs.js:
const TF = require("Text2Frame-MV/Text2Frame.cjs.js")

// テキストからイベントコマンドのJSONを生成
const date = new Date().toLocaleString()
const text = `<comment>
CommonJSモジュールで使用
出力日時: ${date}
</comment>
<Wait: 60>
こんにちは、世界!`

// compile()メソッドでText2Frame記法をJSONに変換
const eventCommands = TF.compile(text)
console.log(JSON.stringify(eventCommands, null, 2))
実行方法:
$ node examples/commonjs.jsモダンなJavaScriptのimport構文を使用する場合は、.es.mjsファイルをインポートします。
.mjs拡張子のファイルか、package.jsonで"type": "module"を指定する必要があります。
examples/esmodules.mjs:
import TF from "Text2Frame-MV/Text2Frame.es.mjs"

// テキストからイベントコマンドのJSONを生成
const date = new Date().toLocaleString()
const text = `<comment>
ES Moduleで使用
出力日時: ${date}
</comment>
<PlayBGM: Theme1, 90, 100, 0>
今日も一日がんばるぞい!`

// compile()メソッドでText2Frame記法をJSONに変換
const eventCommands = TF.compile(text)
console.log(JSON.stringify(eventCommands, null, 2))
実行方法:
$ node examples/esmodules.mjsText2Frameモジュールは以下のメソッドを提供します:
TF.compile(text): Text2Frame記法のテキストをRPGツクールMV/MZのイベントコマンドJSON配列に変換します- 戻り値: イベントコマンドのJSON配列(Map.jsonやCommonEvents.jsonに組み込み可能な形式)
import TF from "Text2Frame-MV/Text2Frame.es.mjs"
import fs from "fs"

// テキストファイルを読み込む
const scenarioText = fs.readFileSync("scenario/chapter1.txt", "utf-8")

// Text2Frame記法をイベントコマンドに変換
const eventCommands = TF.compile(scenarioText)

// 既存のマップJSONを読み込む
const mapData = JSON.parse(fs.readFileSync("data/Map001.json", "utf-8"))

// イベントコマンドを指定のイベントに組み込む
const eventId = 1
const pageId = 0
mapData.events[eventId].pages[pageId].list = eventCommands

// マップJSONを保存
fs.writeFileSync("data/Map001.json", JSON.stringify(mapData, null, 2))

console.log("イベントコマンドの組み込みが完了しました!")$ npm run lint
$ npm run test
MIT LICENSE
A development support plugin for RPG Maker MV/MZ that easily converts text files (.txt files, etc.) into "Show Text" event commands.
This plugin supports developers who want to edit dialogues in text editors other than RPG Maker MV/MZ and later import them as event commands.
By executing a plugin command, you can load a text file and import it as event commands into RPG Maker MV/MZ map events or common events.
This eliminates the need to edit lines, window display settings (position, background), and BGM directly in RPG Maker.
For the most basic usage, see the demo below. For advanced usage and detailed plugin parameters, refer to the wiki.
Demo/Quick Start
- Create a scenario file
- Save it as text/message.txt
- Create an event to execute the plugin command
- Configure the plugin command
- Create the destination event
- Execute the plugin command for testing
- Reload or reopen the project
For more detailed instructions, refer to the wiki.
- Download Text2Frame.js from here.
- Place it in the plugin folder of your project.
- Enable the Text2Frame plugin from the plugin editor.
You can use tags to change message settings such as face, background, and position. These default values can be changed from the plugin options.
You can specify the face to be displayed in the window.
You can change the window background.
You can change the window position.
You can specify the name to be displayed in the window.
In addition to "Show Text", all other event commands are also supported. By inserting the following tags between messages, those tags will be replaced with event commands. For example:
<Set: 1, 2>
<CommonEvent: 3>
Let's do our best today!
This will insert "Control Variables (assign constant 2 to variable 1)" and "Common Event (ID 3)" event commands before the message "Let's do our best today!".
For details on all tags, refer to the wiki grammar page or the help documentation in the plugin itself.
Below is a quick reference table for commonly used event commands. All event commands are supported beyond what is listed here.
| Event Command | Tag | Details |
|---|---|---|
| Show Choices | <ShowChoices> <When: Yes> Process when choice 1 is selected <When: No> Process when choice 2 is selected <End> |
Display "Yes" and "No" choices. |
| Control Switches (ON) | <Switch: 1, ON> | Turn switch 1 ON. |
| Control Switches (OFF) | <Switch: 1, OFF> | Turn switch 1 OFF. |
| Control Variables (Assign) | <Set: 1, 2> | Assign constant 2 to variable 1. |
| Control Variables (Add) | <Add: 1, V[20]> | Add the value of variable 20 to variable 1. |
| Control Variables (Subtract) | <Sub: 1, R[50][100]> | Subtract a random number (min 50, max 100) from variable 1. |
| Control Variables (Multiply) | <Mul: 1-10, GD[Item][2]> | Multiply variables 1-10 by the number of items with ID 2. |
| Control Variables (Divide) | <Div: 1, GD[BattleCount]> | Divide variable 1 by the battle count. |
| Control Variables (Modulo) | <Mod: 1-10, SC[$dataMap.width;]> | Assign the modulo of "$dataMap.width" to variables 1-10. |
| Control Self Switch (ON) | <SelfSwitch: A, ON> | Turn self switch A ON. |
| Control Self Switch (OFF) | <SelfSwitch: A, OFF> | Turn self switch A OFF. |
| Conditional Branch | <If: Switch[1], ON> Process when condition is met <Else> Process when condition is not met <End> |
Branch process based on "if switch 1 is ON". |
| Loop | <Loop> Process to loop <RepeatAbove> |
Loop the process. |
| Break Loop | <BreakLoop> | Break the loop at this point. |
| Common Event | <CommonEvent: 1> | Insert common event with ID 1. |
| Label | <Label: Sample> | Set a label named "Sample". |
| Jump to Label | <JumpToLabel: Sample> | Jump to the label named "Sample". |
| Comment | <comment> Let's do our best today! </comment> |
Insert a comment "Let's do our best today!". |
| Change Gold | <ChangeGold: Increase, 100> | Increase gold by 100. |
| Change Items | <ChangeItems: 3, Increase, 4> | Increase item with ID 3 by 4. |
| Change Weapons | <ChangeWeapons: 1, Increase, 2> | Increase weapon with ID 1 by 2. |
| Change Armors | <ChangeArmors: 1, Increase, 2> | Increase armor with ID 1 by 2. |
| Transfer Player | <TransferPlayer: Direct[1][10][20], Retain, Black> | Transfer to map ID 1, X:10, Y:20 with retained direction and black fade. |
| Show Picture | <ShowPicture: 1, Castle, Scale[50][55]> | Display Castle.png as picture 1 with 50% width and 55% height. |
| Move Picture | <MovePicture: 1, Position[Center][200][Variables[3]]> | Move picture 1 to center origin, X:200, Y:variable 3. |
| Rotate Picture | <RotatePicture: 1, -30> | Rotate picture 1 at speed -30. |
| Tint Picture | <TintPicture: 1, Duration[60], ColorTone[0][100][255][50]> | Tint picture 1 to R:0, G:100, B:255, Gray:50 over 60 frames (1 second). |
| Erase Picture | <ErasePicture: 1> | Erase picture 1. |
| Wait | <Wait: 60> | Insert a wait of 60 frames (1 second). |
| Fadeout Screen | <FadeOut> | Fade out the screen. |
| Fadein Screen | <FadeIn> | Fade in the screen. |
| Tint Screen | <TintScreen: Duration[60], ColorTone[0][100][255][50]> | Tint the screen to R:0, G:100, B:255, Gray:50 over 60 frames (1 second). |
| Flash Screen | <FlashScreen: 50, 100, 150, 170, 60> | Flash the screen with R:50, G:100, B:150, intensity:170 over 60 frames (1 second). |
| Shake Screen | <ShakeScreen: 5, 8, 60> | Shake the screen with power:5, speed:8 over 60 frames. |
| Play BGM | <PlayBGM: Battle1, 90, 100, 0> | Play Battle1 as BGM with volume:90, pitch:100, pan:0. |
| Fadeout BGM | <FadeoutBGM: 10> | Fade out BGM over 10 seconds. |
| Play BGS | <PlayBGS: City, 90, 100, 0> | Play City as BGS with volume:90, pitch:100, pan:0. |
| Fadeout BGS | <FadeoutBGS: 20> | Fade out BGS over 20 seconds. |
| Play ME | <PlayME: Curse1, 90, 100, 0> | Play Curse1 as ME with volume:90, pitch:100, pan:0. |
| Play SE | <PlaySE: Attack1, 90, 100, 0> | Play Attack1 as SE with volume:90, pitch:100, pan:0. |
| Stop SE | <StopSE> | Stop SE. |
| Battle Processing | <BattleProcessing: 1> | Battle with enemy troop 1. |
| Battle Processing (Defeat Event) | <BattleProcessing: 1> <IfWin> Process on victory <IfLose> Process on defeat <End> |
Battle with enemy troop 1 with defeat event. |
| Open Save Screen | <OpenSaveScreen> | Open the save screen. |
| Script | <script> console.log("Let's go!"); </script> |
Insert "console.log("Let's go!");" as a script event. |
| Plugin Command | <PluginCommand: IMPORT_MESSAGE_TO_EVENT> | Insert "IMPORT_MESSAGE_TO_EVENT" as a plugin command. |
For more specific examples and other event commands, refer to the Test Text Examples page.
If you write "%" at the beginning of a line, it will be treated as a comment and will not be imported. This comment-out symbol can be changed in the plugin parameters. For examples, refer to the corresponding wiki page.
You can export not only to map events but also to common events. For examples, refer to the corresponding wiki page.
When you want to load multiple files or apply different options for each file, you can perform more advanced control using plugin command arguments. This feature is for RPG Maker MV. In RPG Maker MZ, you can set directly from the plugin command.
For details, refer to the corresponding wiki page.
Frame2Text is also available - a plugin that exports RPG Maker MV/MZ event commands to text following Text2Frame notation.
Download Frame2Text from here.
For detailed usage, refer to the Frame2Text introduction page or the help documentation in the plugin itself.
- @Asyun3i9t
- inazumasoft:Shick
$ npm ci
$ npm run build --if-present
Usage: Text2Frame [options]

Options:
  -V, --version                         output the version number
  -m, --mode <map|common|compile|test>  output mode
  -t, --text_path <name>                text file path
  -o, --output_path <name>              output file path
  -e, --event_id <name>                 event file id
  -p, --page_id <name>                  page id
  -c, --common_event_id <name>          common event id
  -w, --overwrite <true/false>          overwrite mode (default: "false")
  -v, --verbose                         debug mode (default: false)
  -h, --help                            display help for command

===== Manual =====
    NAME
       Text2Frame - Simple compiler to convert text to event command.
    SYNOPSIS
        node Text2Frame.js --verbose --mode map --text_path <text file path> --output_path <output file path> --event_id <event id> --page_id <page id> --overwrite <true|false>
        node Text2Frame.js --verbose --mode common --text_path <text file path> --common_event_id <common event id> --overwrite <true|false>
        node Text2Frame.js --mode compile
        node Text2Frame.js --verbose --mode test
    DESCRIPTION
        node Text2Frame.js --verbose --mode map --text_path <text file path> --output_path <output file path> --event_id <event id> --page_id <page id> --overwrite <true|false>
          Map event output mode.
          Specify the file to read, output map, and whether to overwrite with arguments.
          Example commands to read test/basic.txt and overwrite data/Map001.json:

          Example 1: $ node Text2Frame.js --mode map --text_path test/basic.txt --output_path data/Map001.json --event_id 1 --page_id 1 --overwrite true
          Example 2: $ node Text2Frame.js -m map -t test/basic.txt -o data/Map001.json -e 1 -p 1 -w true

        node Text2Frame.js --verbose --mode common --text_path <text file path> --common_event_id <common event id> --overwrite <true|false>
          Common event output mode.
          Specify the file to read, output common event, and whether to overwrite with arguments.
          Example commands to read test/basic.txt and overwrite data/CommonEvents.json:

          Example 1: $ node Text2Frame.js --mode common --text_path test/basic.txt --output_path data/CommonEvents.json --common_event_id 1 --overwrite true
          Example 2: $ node Text2Frame.js -m common -t test/basic.txt -o data/CommonEvents.json -c 1 -w true

        node Text2Frame.js --mode compile
          Compile mode.
          When you provide text to convert via pipe, it outputs JSON converted to corresponding events to stdout.
          In this mode, it is not formatted as Map.json / CommonEvent.json, but only outputs JSON converted to events,
          so you need to incorporate it into Map.json/CommonEvent.json yourself.

          Example 1: $ cat test/basic.txt | node Text2Frame.js --mode compile

        node Text2Frame.js --mode test
          Test mode. Reads test/basic.txt and outputs to data/Map001.json.
$ npm run debug -- --mode map --text_path test/basic.txt --output_path data/Map001.json --event_id 1 --overwrite true

> [email protected] debug /home/yuki/github/Text2Frame-MV
> node Text2Frame.js "--mode" "map" "--text_path" "test/basic.txt" "--output_path" "data/Map001.json" "--event_id" "1" "--overwrite" "true"

Please restart RPG Maker MV(Editor) WITHOUT save.
Text2Frame can be used as a library in Node.js projects. It supports both CommonJS and ES Module formats, allowing you to choose based on your project environment.
You can install directly from the GitHub repository using npm:
$ npm install 'yktsr/Text2Frame-MV'Or add the following to your package.json:
{
  "dependencies": {
    "Text2Frame-MV": "yktsr/Text2Frame-MV"
  }
}If you're using traditional Node.js require syntax, import the .cjs.js file.
examples/commonjs.js:
const TF = require("Text2Frame-MV/Text2Frame.cjs.js")

// Generate event command JSON from text
const date = new Date().toLocaleString()
const text = `<comment>
Using CommonJS module
Output date: ${date}
</comment>
<Wait: 60>
Hello, World!`

// Convert Text2Frame notation to JSON using compile() method
const eventCommands = TF.compile(text)
console.log(JSON.stringify(eventCommands, null, 2))
How to run:
$ node examples/commonjs.jsIf you're using modern JavaScript import syntax, import the .es.mjs file.
You need to either use .mjs file extension or specify "type": "module" in package.json.
examples/esmodules.mjs:
import TF from "Text2Frame-MV/Text2Frame.es.mjs"

// Generate event command JSON from text
const date = new Date().toLocaleString()
const text = `<comment>
Using ES Module
Output date: ${date}
</comment>
<PlayBGM: Theme1, 90, 100, 0>
Let's do our best today!`

// Convert Text2Frame notation to JSON using compile() method
const eventCommands = TF.compile(text)
console.log(JSON.stringify(eventCommands, null, 2))
How to run:
$ node examples/esmodules.mjsThe Text2Frame module provides the following methods:
TF.compile(text): Converts Text2Frame notation text into RPG Maker MV/MZ event command JSON array- Return value: JSON array of event commands (format that can be incorporated into Map.json or CommonEvents.json)
import TF from "Text2Frame-MV/Text2Frame.es.mjs"
import fs from "fs"

// Read text file
const scenarioText = fs.readFileSync("scenario/chapter1.txt", "utf-8")

// Convert Text2Frame notation to event commands
const eventCommands = TF.compile(scenarioText)

// Load existing map JSON
const mapData = JSON.parse(fs.readFileSync("data/Map001.json", "utf-8"))

// Incorporate event commands into specified event
const eventId = 1
const pageId = 0
mapData.events[eventId].pages[pageId].list = eventCommands

// Save map JSON
fs.writeFileSync("data/Map001.json", JSON.stringify(mapData, null, 2))

console.log("Event commands have been successfully incorporated!")$ npm run lint
$ npm run test
MIT LICENSE