- Routing Different Windows Applications Through Different Network Interfaces Using Squid Proxy
After switching to fiber optic, I had to route my connection through powerline (CPL), which was catastrophic in terms of stability and speed, knowing that there could be another person on the connection. Recently, when switching to a PCIe card, I wondered if I could have & use multiple internet connections on Windows, and how to proceed. Today there are two methods: combining these connections which offers stability but with significant loss, and separating flows by task.
Bandwidth aggregation => Speedify, Connectify, pfSense Task separation by network card => ForceBindIP, Proxifier, manual routes
In our case, we'll focus on task separation, but the software is either outdated - ForceBindIp doesn't work on modern browsers - or paid like Proxifier and still quite limited. In short, we won't cover all cases; in the end, we'll need to do manual routing (proxy). I'm sharing this method due to the scarcity of resources on this subject despite this DIY project.
Quick ForceBindIp installation and usage tutorial
In this short tutorial, we'll see how to use Squid as a proxy for Firefox. Chrome and Edge seem to use the computer's proxy, so it will be more complicated for you to separate by browser instances.
This tutorial is therefore intended for those who cannot take full advantage of their internet box connection because they cannot connect directly to their router, and there is still a lot of bandwidth available for use on the WiFi band(s).
Your router may allow you to split the flow into several bands, for example 5GHz (I don't have this option). Also, some internet routers do not allow you to get the maximum bandwidth on Wi-Fi.
┌───────────────────┐
│     Streaming     │---> Proxy 127.0.0.1:13130 ---> USB Interface (192.168.1.XX) ---> Internet
└───────────────────┘

┌───────────────────┐
│     Downloads     │---> Proxy 127.0.0.1:13129 ---> PCIe Interface (192.168.1.XX) ---> Internet
└───────────────────┘

┌──────────────────┐
│   Light Usage    │---> Proxy 127.0.0.1:13128 ---> PLC Interface (192.168.1.XX)  ---> Internet
└──────────────────┘
┌───────────────────┐
│     Browsing      │---> Proxy 127.0.0.1:13130 ---> USB Interface (192.168.1.XX) ---> Internet
└───────────────────┘

┌───────────────────┐
│       Game        │---> Proxy 127.0.0.1:13129 ---> PCIe Interface (192.168.1.XX) ---> Internet
└───────────────────┘

┌──────────────────┐
│   OBS Stream     │---> Proxy 127.0.0.1:13128 ---> PLC Interface (192.168.1.XX)  ---> Internet
└──────────────────┘
Allows testing different connections and applications via these different connections. And more....
Tutorial for Windows It's impossible on Windows to use the same SSID for two different internet cards; even if both connect, they will actually use the connection alternately / by priority. Made for local use; if you want to share, change 127.0.0.1 to 0.0.0.0 but add an authentication system for security. Done on Windows 10
I'll use a Power Line Communication, PCIe card, and Wi-Fi dongle in this tutorial. I'll try to speak to beginners to open this project to the largest number of interested people, sorry if you find me too verbose.
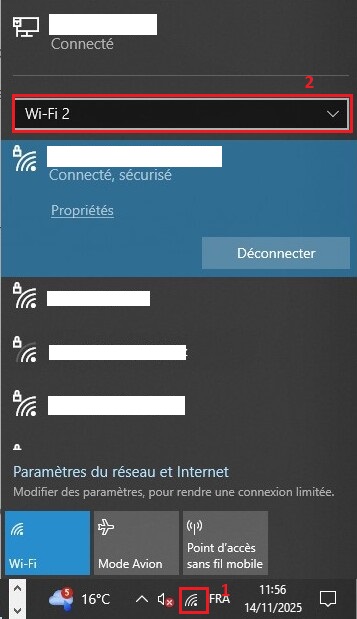
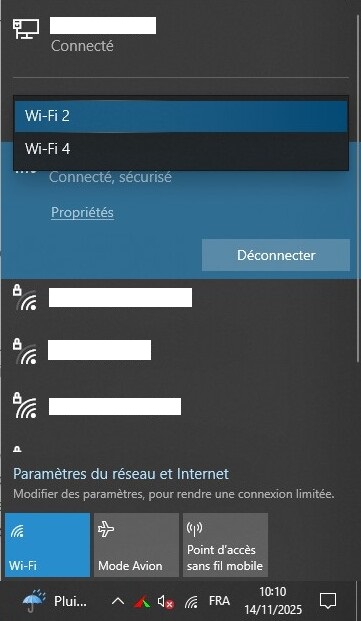
Connect to networks with your different connection methods to enter the password and save the connection in Windows. If you have multiple Wi-Fi connections, go to the Wi-Fi icon at the bottom right, then connect to the network for each connection.
Let's start by installing Squid for Windows, that's all we'll use. Take the Console App version called "Squid for Windows" Squid
If you installed the web proxy for Windows by mistake, you can follow this guide from my experience to uninstall it (unless you know how to use it of course)
Squid Web proxy uninstallation tutorial
Once you've downloaded a file named squid.msi, run it and follow the steps, choose your project location, be careful to put "Squid" in the installation location otherwise the installer will install at the root. You can install in your Programme File if you want, personally I put it under D:\Documents\Tools\Squid.
Once installed you should have:
Squid/
├── bin/
├── dev/
│   └── shm/
├── etc/
│   └── squid/
├── logs/
├── usr/
└── var/
- At the project root in
Squid, we'll put our different scripts for proxy management - In
bin/we'll find the launchersquid.exe, we won't need to touch this folder. - In
dev/shm/, we'll find temporary and shared .shm files which can cause bugs, normally you won't need to touch it. - In
etc/squid/, we'll put our.confconfiguration files for each of our interfaces. - In
logs/we'll create log files that we can disable or improve later if you wish. - We won't use the last two folders
usrandvar
Here you'll find commands that will be useful for this project
tasklist | findstr squid : Search for all tasks named squid
taskkill /F /IM squid.exe : Close all squid.exe tasks
netstat -ano | findstr "8130" Search for all tasks on port 8130.
Meaning of arguments used:
- Used with argument -a, the netstat command displays all connections and listening ports on the machine.
- Used with argument -n, the netstat command displays addresses and port numbers in numeric format, without name resolution.
- Used with argument -o, the netstat command details the process number associated with the connection.
netsh wlan show interfaces allows you to display your Wi-Fi (Lan) network cards without all virtual or inactive cards (RJ45 connection is not displayed either).
ipconfig : Display all available network cards, to find the one you're looking for, look at Connection-specific DNS Suffix. . . : lan
You can use the connections.ps1 file to see all TCP connections with program details using PowerShell (to run the program open PowerShell from Windows, navigate with cd to the directory where the file is, and type .\connections.ps1)
Kill a single process at a time:
netstat -ano | find ":13129"
You'll get something like:
TCP 127.0.0.1:13129 0.0.0.0:0 LISTENING 1234
Here, 1234 is the PID of the process using port 13129.
taskkill /PID 1234 /F
Let's start by retrieving your network card IPs, yes, that's why you had to connect them at least once. Press win or win+r and type cmd, this will open the command prompt. Type ipconfig and search for your cards among all those displayed, hint: look at Connection-specific DNS Suffix. . . : lan to find it more easily.
You can use the command netsh wlan show interfaces if you're only looking for Wi-Fi connections.
Then you can use the connections.ps1 file found in scripts to see all TCP connections with program details.
(To run the program open PowerShell from Windows by typing PowerShell in the search bar, navigate with cd to the directory where the file is {just type the drive letter with : to change disks D: to switch from drive C to D}, and type .\connections.ps1)
Once done, all your local ports used by services will be displayed.
We'll now check ports reserved by Windows with the command netsh interface ipv4 show excludedportrange protocol=tcp
Result:
Protocol tcp Port Exclusion Ranges
Start Port    End Port
----------    --------
        80          80
      1487        1487
      5673        5673
      5674        5674
      7058        7058
      7452        7551
      7552        7651
      7652        7751
      7852        7951
      8052        8151
      8152        8251
      8252        8351
      8352        8451
      8452        8551
      8670        8769
      8770        8869
      8870        8969
      9070        9169
      9281        9380
      9381        9480
      9481        9580
      9581        9680
      9681        9780
     10090       10189
     10190       10289
     10290       10389
     10490       10589
     10690       10789
     10790       10889
     10890       10989
     10990       11089
     11090       11189
     11238       11337
     11338       11437
     11495       11594
     11595       11694
     11695       11794
     11795       11894
     11895       11994
     11995       12094
     12095       12194
     12195       12294
     12295       12394
     12395       12494
     12495       12594
     12595       12694
     22000       22000
     42137       42236
     42237       42336
     42337       42436
     42537       42636
     42737       42836
     42837       42936
     42937       43036
     43037       43136
     43137       43236
     43256       43355
     43356       43455
     43456       43555
     43556       43655
     43656       43755
     44260       44359
     44360       44459
     44460       44559
     44560       44659
     44660       44759
     50000       50059     *
* - Administered port exclusions.
Not all these ports are necessarily used, but can be used; they're reserved by Windows updates, Hyper-V for many, and are not used.
If you really have many occupied ports like this, you can start by opening the terminal (cmd) as administrator and do net stop winnat, then net start winnat.
Redo the command netsh interface ipv4 show excludedportrange protocol=tcp, you should have significantly fewer reserved IP addresses now.
Start Port    End Port
----------    --------
        80          80
      1487        1487
      5673        5673
      5674        5674
     22000       22000
     50000       50059     *

* - Administered port exclusions.
You must have noticed, but a * appears next to certain ports, this sign is used to signify that the ports are permanently reserved.
50000 50059 * are system ports reserved for Windows.
We'll use this same system to reserve our ports otherwise Windows might take these ports at some point. We'll use the 1310X port range for our project, not reserved and no applications on it.
Let's start by reserving our ports, for me from 13128 to 13130.
Run netsh int ipv4 add excludedportrange protocol=tcp startport=13128 numberofports=3 store=persistent under cmd as administrator.
Then check with netsh interface ipv4 show excludedportrange protocol=tcp, you should have a line 13128 13130 * appearing.
C:\WINDOWS\system32>netsh interface ipv4 show excludedportrange protocol=tcp

Protocol tcp Port Exclusion Ranges

Start Port    End Port
----------    --------
        80          80
      1487        1487
      5673        5673
      5674        5674
     13128       13130     *
     22000       22000
     50000       50059     *

* - Administered port exclusions.
We can now start, we'll create the first config file
Bonus: make network card IP addresses static
Bonus: Ports reserved for Squid
squid_pcie.conf file created in Squid\etc\squid
# 127.0.0.1 to indicate we're local; if we had put 0.0.0.0, other people on the local network could have connected
# Choose a free port to replace 13129
http_port 127.0.0.1:13129
# The IP address of your network card you want to use as proxy
tcp_outgoing_address 192.168.1.xx
pid_filename D:/Documents/Tools/Squid/var/run/squid_pcie.pid

# Google DNS, you can put your ISP's or another if you want
dns_nameservers 8.8.8.8 8.8.4.4
dns_v4_first on

# Completely disable cache
cache deny all
cache_mem 0 MB
memory_pools off

# Privacy, prevents our local IP from appearing in HTTP headers
forwarded_for off
# Logs, you can disable them with `access_log none` and `cache_log none`
access_log D:/Documents/Tools/Squid/logs/access_pcie.log
cache_log D:/Documents/Tools/Squid/logs/cache_pcie.log

# Access Control Lists, basic security information
# `acl CONNECT method CONNECT` for HTTPS traffic SSL/TLS encrypted
acl localnet src 127.0.0.1 192.168.1.0/24
acl SSL_ports port 443
acl Safe_ports port 80 443
acl CONNECT method CONNECT

# Access rules to secure connection in local mode
http_access deny !Safe_ports
http_access deny CONNECT !SSL_ports
http_access allow localnet
http_access deny all
Remove explanatory comments (starting with #), keep/put what's useful to you.
Do the same for each proxy you need to create, keep a logical name for your config files to recognize them easily, and if possible try to group your chosen ports, e.g.: 13128, 13129, 13130.
In logs/, you can pre-create all your log files, here cache_pcie and access_pcie in our configuration file example. Do this for each configuration, otherwise, the program should create them on its own.
And here we come to script creation, we'll do it step by step. First script to launch pcie
@echo off
D:\Documents\Tools\Squid\bin\squid.exe -f D:\Documents\Tools\Squid\etc\squid\squid_pcie.conf -N
Ok, nothing complicated for that one, just replace D:\Documents\Tools\Squid with your location and squid_pcie.conf with your file name
ℹ️ By the way, if you have errors you can check in the errors section if they're listed just in case.
You can now open cmd as administrator to be able to close the application if needed (open cmd and navigate to the Squid root)
You can now verify that the Squid process launched properly
with the command tasklist | findstr squid or netstat -ano | findstr "13129" to check if the program is open on the port you set, replace 13129 with your port
taskkill /F /IM squid.exe : Close all squid.exe tasks (requires administrator rights)
Kill a single Squid process at a time:
netstat -ano | find ":13129"
You'll get something like:
TCP 127.0.0.1:13129 0.0.0.0:0 LISTENING 1234
Here, 1234 is the PID of the process using port 13129.
taskkill /PID 1234 /F
Let's move on to the second version of the code
# Window configuration
@echo off
title Squid PCIe Proxy (13129)
color 0A

# Display header
echo ========================================
echo   Starting Squid PCIe Proxy
echo ========================================
echo.

# Check if port 13129 is already in use
netstat -ano | findstr ":13129" >nul 2>&1
if %errorlevel% equ 0 (
    echo [!] Port 13129 already in use!
    echo [!] PCIe proxy may already be running
    pause
    exit /b 1
)

# Delete temporary files that could cause conflicts
echo [*] Cleaning temporary files...
del /Q D:\Documents\Tools\Squid\dev\shm\squid-cf__*pcie*.shm >nul 2>&1
del /Q D:\Documents\Tools\Squid\var\run\squid_pcie.pid >nul 2>&1

# Display startup information
echo [*] Starting PCIe proxy...
echo.
echo [+] Proxy started running on 127.0.0.1:13129
echo [+] Interface: Wi-Fi PCIe (192.168.1.XX)
echo.
echo ========================================
echo   Press Ctrl+C to stop this proxy
echo ========================================
echo.

# Run Squid in foreground mode (-N = stays attached to the window)
D:\Documents\Tools\Squid\sbin\squid.exe -f D:\Documents\Tools\Squid\etc\squid\squid_pcie.conf -N
Rather than using the command prompt to see if it has started correctly, you can use the status.bat script, replacing the ports used with the ones you will be using. All you have to do is double-click on the .bat file, otherwise do as before (tasklist | findstr squid or netstat -ano | findstr “13129” ).
You can kill the programs as before or use Stop_all.bat.
You can also use the program diag_squid.bat, if you are interested. It will display something like
[1] Network Interfaces Status:
----------------------------------------
    Adresse IP :                           192.168.1.XX
    Adresse IP :                           192.168.1.XX
    Adresse IP :                           192.168.1.XX

[2] Expected IPs:
----------------------------------------
CPL:  192.168.1.XX (Ethernet)
PCIe: 192.168.1.XX (Wi-Fi 2)
USB:  192.168.1.XX (Wi-Fi 4)

[3] Squid Processes:
----------------------------------------

[4] Listening Ports:
----------------------------------------

[5] WiFi Connection Status:
----------------------------------------
    SSID                   : MAbox-XXXXXXXX-5GHz_EXT
    BSSID                  : XX:00:X0:0X:X0:00
    SSID                   : MAbox-XXXXXXXX-5GHz
    BSSID                  : 0X:XX:X0:0X:0X:X0
If we take a closer look at the program, we need to specify our interfaces. I have three here, but enter whatever you have. You must specify the name of your interfaces, which for me are Ethernet, “Wi-Fi 2,” and “Wi-Fi 4,” the IP addresses, and the output ports you have chosen (sections 1, 2, 4).
@echo off
title Squid Diagnostic Tool
color 0E

echo ========================================
echo   SQUID DIAGNOSTIC REPORT
echo ========================================
echo.

echo [1] Network Interfaces Status:
echo ----------------------------------------
netsh interface ip show addresses "Ethernet" 2>nul | findstr "IP Address"
netsh interface ip show addresses "Wi-Fi 2" 2>nul | findstr "IP Address"
netsh interface ip show addresses "Wi-Fi 4" 2>nul | findstr "IP Address"
echo.

echo [2] Expected IPs:
echo ----------------------------------------
echo CPL:  192.168.1.XX (Ethernet)
echo PCIe: 192.168.1.XX (Wi-Fi 2)
echo USB:  192.168.1.XX (Wi-Fi 4)
echo.

echo [3] Squid Processes:
echo ----------------------------------------
tasklist | findstr squid.exe
echo.

echo [4] Listening Ports:
echo ----------------------------------------
netstat -ano | findstr "LISTENING" | findstr "13128 13129 13130"
echo.

echo [5] WiFi Connection Status:
echo ----------------------------------------
netsh wlan show interfaces | findstr "SSID State"
echo.

break
Now that we've done that, let's go back to our Start code. You may have noticed that, for now, everything launches in a batch file and remains open. It's not ideal to automate all of this for everyday use, with all of these windows open all the time.
You can use the start_squid_pcie_silent.bat script, which contains
START /MIN CMD.EXE /C start_squid_pcie.batIt will launch the script in reduced mode, which is not exactly what we are looking for.
From what I've seen, it's not possible to make a true silent script in pure BAT.
So we'll switch to .vbs, which you may have already seen in the scripts folder.
Let's look at the structure of the vbs file stop_all.vbs
Set WshShell = CreateObject("WScript.Shell")
WshShell.Run "taskkill /F /IM squid.exe", 0, False
We start by creating a Windows Shell object to execute commands,
then we:
"taskkill /F /IM squid.exe" Kills all Squid processes
0 = Hidden window (no visible CMD)
False = Do not wait for execution to finish
It's the same for start_all.vbs, we just start the .bat with these parameters rather than executing the command directly.
WshShell.Run "D:\Documents\Tools\Squid\start_squid_pcie.bat", 0, False
You can test all this with all your current programs.
If you want to test whether your proxy is working, you can go directly to the section on Firefox and come back here afterwards .
Okay, let's continue. We're going to create the vbs files and .bat files for testing. They aren't necessary, they just give you a different way of doing things.
Set WshShell = CreateObject("WScript.Shell")

' Nettoyer les fichiers temporaires
WshShell.Run "cmd /c del /Q D:\Documents\Tools\Squid\dev\shm\squid-cf__*pcie*.shm", 0, True
WshShell.Run "cmd /c del /Q D:\Documents\Tools\Squid\var\run\squid_pcie.pid", 0, True

' Lancer le proxy PCIe
WshShell.Run "D:\Documents\Tools\Squid\bin\squid.exe -f D:\Documents\Tools\Squid\etc\squid\squid_pcie.conf -N", 0, False

WScript.Sleep 2000

' Notification
WshShell.Popup "PCIe Proxy Started" & vbCrLf & vbCrLf & "Listening on: 127.0.0.1:13129" & vbCrLf & "Interface: 192.168.1.XX", 3, "Squid PCIe", 64
As you can see, it's pretty simple based on what we've seen previously. You need to change the path, .conf file name, port, IP, and PCIe according to what you want to set. The script sends you a small Windows notification when the program has finished launching itself. This notification disappears on its own.
- 3 = Display duration in seconds (the popup closes automatically after 3 seconds)
- 64 = Icon type (64 = information icon ℹ️)
vbCrLf= Line break & vbCrLf &= Concatenation with line break For your information, a display duration of 0 means that the popup remains displayed until the user clicks on it.
Other types of icon parameters
| Value | Icon | Description |
|---|---|---|
0 |
No icon | |
16 |
❌ | Error icon (red cross) |
32 |
❓ | Question icon |
48 |
Warning icon (yellow triangle) | |
64 |
ℹ️ | Information icon (blue i) |
I'm switching to the latest version of the script to check and force Windows to automatically connect to Wi-Fi when it's not the default connection.
File start_squid_pcie_with_check.bat
@echo off
title Squid USB Proxy (13130) - With Connection Check
color 0A
setlocal enabledelayedexpansion

REM ================================
REM        CONFIGURATION
REM ================================
set "SQUID_PATH=D:\Documents\Tools\Squid"
set "INTERFACE=Wi-Fi 2"
REM set "SSID=Bbox-520CD38F-5GHz"
set "SSID=Bbox-520CD38F-5GHz_EXT"
set "IP_EXPECTED=192.168.1.70"
set "PORT=8130"
set "CONF_FILE=%SQUID_PATH%\etc\squid\squid_usb.conf"
set "EXECUTABLE=%SQUID_PATH%\bin\squid.exe"
Rem LOG variable not used
set "LOG=%SQUID_PATH%\logs\cache_usb.log"

echo ========================================
echo      Starting Squid USB Proxy
echo ========================================
echo.

REM ================================
REM Check if Wi-Fi is connected to the correct SSID
REM ================================
set "CONNECTED=0"
set "ATTEMPT=0"

:CHECK_WIFI
set /a ATTEMPT+=1
echo [*] Checking Wi-Fi connection to "%SSID%" (Attempt %ATTEMPT%/5)...
netsh wlan show interfaces | findstr /C:"SSID" | findstr "%SSID%" >nul 2>nul
if not errorlevel 1 (
    set "CONNECTED=1"
    goto WIFI_CONNECTED
)
echo [!] Not connected, attempting auto-connect...
netsh wlan connect name="%SSID%" interface="%INTERFACE%"
timeout /t 5 /nobreak >nul
if %ATTEMPT% lss 5 goto CHECK_WIFI

if %CONNECTED%==0 (
    echo [!] ERROR: Could not connect to SSID "%SSID%". Aborting.
    pause
    exit /b 1
)

:WIFI_CONNECTED
echo [+] Connected to SSID "%SSID%"


REM ================================
REM Wait until the IP is available
REM ================================
echo [*] Waiting for IP %IP_EXPECTED% on interface "%INTERFACE%"...
set "IP_OK=0"

for /l %%i in (1,1,10) do (
    netsh interface ip show addresses "%INTERFACE%" | findstr "%IP_EXPECTED%" >nul 2>nul
    if not errorlevel 1 (
        set "IP_OK=1"
        goto IP_OK
    )
    timeout /t 2 >nul
)

:IP_OK
if %IP_OK%==0 (
    echo [!] ERROR: IP %IP_EXPECTED% not assigned. Aborting.
    pause
    exit /b 1
)

echo [+] IP %IP_EXPECTED% is now assigned to "%INTERFACE%"

REM ================================
REM Check if the port is already in use
REM ================================
netstat -ano | findstr ":%PORT%" >nul 2>&1
if not errorlevel 1 (
    echo [!] Port %PORT% already in use! Aborting.
    pause
    exit /b 1
)

REM ================================
REM Clean up temporary files
REM ================================
echo [*] Cleaning temporary files...
del /Q "%SQUID_PATH%\dev\shm\squid-cf__*usb*.shm" >nul 2>&1
del /Q "%SQUID_PATH%\var\run\squid_usb.pid" >nul 2>&1

REM ================================
REM Launch Squid
REM ================================
echo [*] Starting USB proxy...
echo [+] Proxy started running on 127.0.0.1:%PORT%
echo [+] Interface: "%INTERFACE%" (IP: %IP_EXPECTED%)
echo.

"%EXECUTABLE%" -f "%CONF_FILE%" -N

echo.
echo ========================================
echo   Press Ctrl + C to stop the proxy
echo ========================================
echo.
pause
This is the last script that still needs some work. At the top, you will find variables to avoid having to reconfigure everything each time, except for cleaning temporary files, which always needs to be changed at the bottom... with `echo [*] Starting PCIe proxy...``which you can change according to your interface. The logs at the top are not used. If you want to add custom logs, feel free to do so :).
This file is valid for Wi-Fi connections, i.e., PCIe and USB in my case. The CPL version is the default on my computer and does not require me to choose the connection, so I can stick with the good old script.
@echo off
title Squid CPL Proxy (13128)
color 0A

echo ========================================
echo   Starting Squid CPL Proxy
echo ========================================
echo.

REM Verifier si deja lance
netstat -ano | findstr ":13128" >nul 2>&1
if %errorlevel% equ 0 (
    echo [!] Port 13128 already in use!
    echo [!] CPL proxy may already be running
    pause
    exit /b 1
)

echo [*] Cleaning temporary files...
del /Q D:\Documents\Tools\Squid\dev\shm\squid-cf__*cpl*.shm >nul 2>&1
del /Q D:\Documents\Tools\Squid\var\run\squid_cpl.pid >nul 2>&1

echo [*] Starting CPL proxy...
echo.

D:\Documents\Tools\Squid\bin\squid.exe -f D:\Documents\Tools\Squid\etc\squid\squid_cpl.conf -N 2>&1 | findstr /C:"Accepting HTTP" >nul
if %errorlevel% equ 0 (
    echo [+] Proxy started running on 127.0.0.1:13128
    echo [+] Interface: Ethernet CPL (192.168.1.XX)
    echo.
    echo ========================================
    echo   Press Ctrl+C to stop this proxy
    echo ========================================
)

D:\Documents\Tools\Squid\bin\squid.exe -f D:\Documents\Tools\Squid\etc\squid\squid_cpl.conf -N
That should be sufficient (since I don't really touch this connection, I'll see if any checks are necessary).
Of course, if you disconnect one of your internet cards, you'll have to change the scripts (or just not run the script in question).
If my experience has helped anyone, I'm delighted :)
- Launch Firefox
- Click on
☰at the top right - Then
Settings - Stay in the
Generaltab and scroll all the way down toNetwork Settings - Click on
Settingsnext to "Configure how Firefox connects to the Internet". - Choose
Manual proxy configuration - Enter in HTTP Proxy:
127.0.0.1, then the port you put in your script for your proxy - Check
Also use this proxy for HTTPSthen validate withOK - And that's it, everything should work normally, test by loading a web page.
- You can check your incoming connections on a proxy by launching
status.bator directlynetstat -ano | findstr "yourport"You'll get:
D:\Documents\Tools\Squid>netstat -ano   | findstr "8129"
  TCP    127.0.0.1:8129         0.0.0.0:0              LISTENING       13524
  TCP    127.0.0.1:8129         127.0.0.1:36656        ESTABLISHED     13524
  TCP    127.0.0.1:36656        127.0.0.1:8129         ESTABLISHED     32440
If you get an error when loading the web page like connection refused or error 503
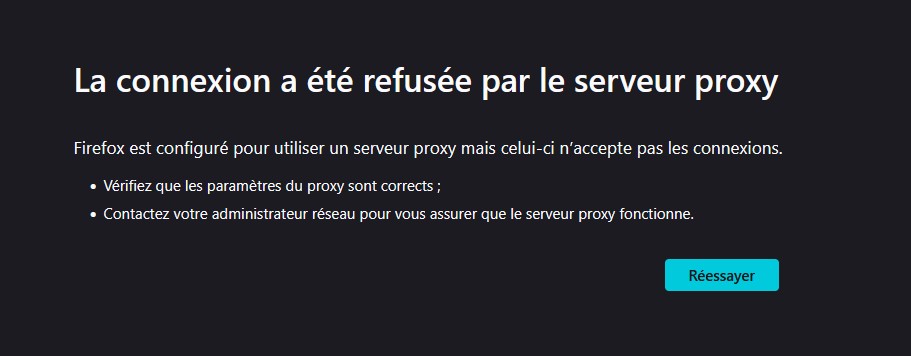 .
It means you either misconfigured either in Firefox or the .conf files, or there's a connection problem with your network interface.
.
It means you either misconfigured either in Firefox or the .conf files, or there's a connection problem with your network interface.
-
Check that your card is properly connected to the network.
-
Check that the interface is properly connected to the chosen address with
ipconfig | findstr "192.168.1.XX" -
Test your connectivity with
ping -S 192.168.1.XX 8.8.8.8. -
If your card is not connected to the network, connect it and test. If it changed IP, you must reconfigure your files, or force a static IP.
-
Check that the ping is properly done to the chosen DNS, check your DNS in the interface's
.conffile if it doesn't ping. -
Check that the proxy information is properly entered in Firefox.
-
If these checks are not enough, verify with
ipconfigyour card's information or if it's unplugged, otherwise I refer you to follow the tutorial step by step
Currently, we've seen quite a few different scripts, but all the .bat and .vbs scripts are at the root of Squid\ for ease. Ouch 😅, not very clean. Let's do some sorting, let's create a Scripts folder at the root and place all our .vba and .bat scripts in it.
You must have noticed, but the last script we saw uses an absolute path. So you'll only need to modify the start_all.vbs script (if you use the latest files from my project, not those seen on the way)
Set WshShell = CreateObject("WScript.Shell")
WshShell.Run "D:\Documents\Tools\Squid\start_squid_usb_with_check.bat", 0, False
WshShell.Run "D:\Documents\Tools\Squid\start_squid_pcie_with_check.bat", 0, False
WshShell.Run "D:\Documents\Tools\Squid\start_squid_cpl.bat", 0, False
becomes
Set WshShell = CreateObject("WScript.Shell")
WshShell.Run "D:\Documents\Tools\Squid\Scripts\start_squid_usb_with_check.bat", 0, False
WshShell.Run "D:\Documents\Tools\Squid\Scripts\start_squid_pcie_with_check.bat", 0, False
WshShell.Run "D:\Documents\Tools\Squid\Scripts\start_squid_cpl.bat", 0, False
If you wish, you can create more subfolders in scripts to categorize. You can of course keep and correct the other scripts seen for more versatility.
Squid/
├── 📁bin/
│     └── squid.exe
├── 📁dev/
│     └── shm/
├── 📁etc/
│     └── 📁squid/
│           ├── ⚙️squid_cpl.conf
│           ├── ⚙️squid_pcie.conf
│           └── ⚙️squid_usb.conf
├── 📁logs/
│     └── 📄access_cpl.log
│     └── 📄access_pcie.log
│     └── 📄access_usb.log
│     └── 📄cache_cpl.log
│     └── 📄cache_pcie.log
│     └── 📄cache_usb.log
├── 📁Scripts/
│     └── ℹ️diag_squid.bat
│     └── ▶️start_all.vbs
│     └── ▶️start_squid_cpl.bat
│     └── ▶️start_squid_pcie_with_check.bat
│     └── ▶️start_squid_usb_with_check.bat
│     └── ℹ️status.bat
│     └── ⏹️stop_all.vbs
├── 📁usr/
└── 📁var/
You can create a file or shortcut of your launch script directly in the Startup file at the following location: C:\Users\yourusername\AppData\Roaming\Microsoft\Windows\Start Menu\Programs\Startup
Here, we'll go directly through Windows Task Scheduler:
- Open Task Scheduler
- Click on
Create Taskon the right (it's important that it's task and not basic task). - Put your task name, description and change configure for Windows 10
- Then go to the
Triggerstab, click onNew...,- Start the task
At startup - Delay task for
30 seconds(adjusted so your network cards can start without issues) Enabledcheckbox- The rest can remain disabled
- Start the task
- Go to the
Actionstab, click onNew...,- For action, put
Start a program - In
Program/script, indicate the location of your .vbs / .bat script, for me:D:\Documents\Tools\Squid\start_all.vbs - Start in (optional), put
D:\Documents\Tools\Squid\, it will launch your script from this folder
- For action, put
- Go to the next tab
Conditions, uncheck everything. - Go to the next tab
Settings,- Check, allow task to be run on demand.
- Leave the rest unchecked
- Keep the dropdown on
Do not start a new instance
- You can exit by pressing
OK, look in your tasks, it should have appeared. - When you were creating your task, you might have seen a
History (disabled)tab with the mention "disabled". This history allows you to follow the trigger logs of your script. If you want to reactivate it:- Click on
Task Scheduler (Local)aboveTask Scheduler Library - Click on
Actionat the very top thenEnable All Tasks History. On Windows you cannot activate history for just one task, but for all your tasks
- Click on
- As I mentioned at the beginning, Windows doesn't accept two network cards on the same SSID, so you can't connect to two Wi-Fi
mybox_5Gxv74Rfgt2_5Ghzwith your two interfaces. You can use the 2.4GHz band or a repeater, it just needs to not have the same SSID, otherwise Windows will silently disconnect and use a network card priority system. - You see the Squid program restarting in a loop after closing it multiple times with
"taskkill /F /IM squid.exe", trysc query | findstr -i squid. If you get a result, it means you installed Windows Squidsrv. I refer you to this markdown Uninstall Squidsrv . - Maybe you used ports that at your next startup will be used by other applications/services according to
connections.ps1. This is why we reserved ports being careful not to take a port used by another application. Follow this step Return to Reserving Available Ports. If your ports are still used after that, you won't have many choices: either close these services or change ports. - If you try to access Speedtest Ookla from one of your proxies, Ookla will give you an error. This doesn't happen with other speed tests I've tested.
- Currently if you haven't disabled caches and your hard drive is full, then the program will crash because it won't be able to write to the
.logfiles. You'll find several lines like2025/11/04 01:01:41| local=127.0.0.1:13130 remote=127.0.0.1:50560 FD 80 flags=1: read/write failure: (113) Software caused connection abortin your log. For this, just putaccess_log noneandcache_log nonein your log files (Return to Creating Configuration Files)
Here is a small end catch-all containing some information that some might find interesting. I may add more if there are questions and answers and I understand how to use them.
- I couldn't test using the same card (Wi-Fi) twice but apparently it should work because their MAC addresses are different.
- Tested only on Windows 10, I don't know the specifics on Windows 11.
Under construction... Some sections still need to be written like English readmes, specific readme (forcebindip), encountered errors, useful bonuses, etc.