
- This repository handles the third workpackage (WP3) of the OPEN!NEXT project to serve possible solutions for Open Source Hardware Commmunity needs.
- OPEN!NEXT received funding from the European Union’s Horizon 2020 research and innovation programme under grant agreement no. 869984.
- Skillmatching as a measure of community management was identified, which is the main focus here.
For this, a generic ontology model of a possible open souce hardware project landscape was developed.
The implementation of the ontology took results from a previous project (OPEN!) into account that also analysed processes and dynamics of OSH community. - Purpose of the ontology model is to fulfill the concepted user stories defined below.
To gather the needs of the OSH community, expert interviews have been conducted. The team derived user stories from the input of those interviews.
User Stories of the D3.1 deliverable of the project can be accessed here
Three main user stories are scope of the case:
- As a contributor on an OSH online platform, I want to add my skills and interests to my profile, so that others know more about my abilities.
- As a contributor on an OSH online platform, I want to find projects that require my specific skills in tasks, so that I can use, improve or evolve my skills.
- As a project core team, we want to find contributors based on their skills and interests so that they can help in carrying out a specific task.
The current development aim was to create a network that is able to give possibilities on assigning skills and interests to contributor profiles, tasks and projects and make them visible for queries. This was built based on the User flows described bevorhand.
- The currently first draft of the ontology model is validated with a sample of project data from Wikifactory. For the validation, user flows were identified and, based on this, queries developed to check for existing results.
- The ontology model has still to be validated by user interaction.
- Afterwards possible adaptions will taken into account.
- The repository will be updated respectively over time.
Building on this development, the next steps aim is to identify regularities for skill matching in order to integrate them into the semantic network and enable case-related automatic assignment.
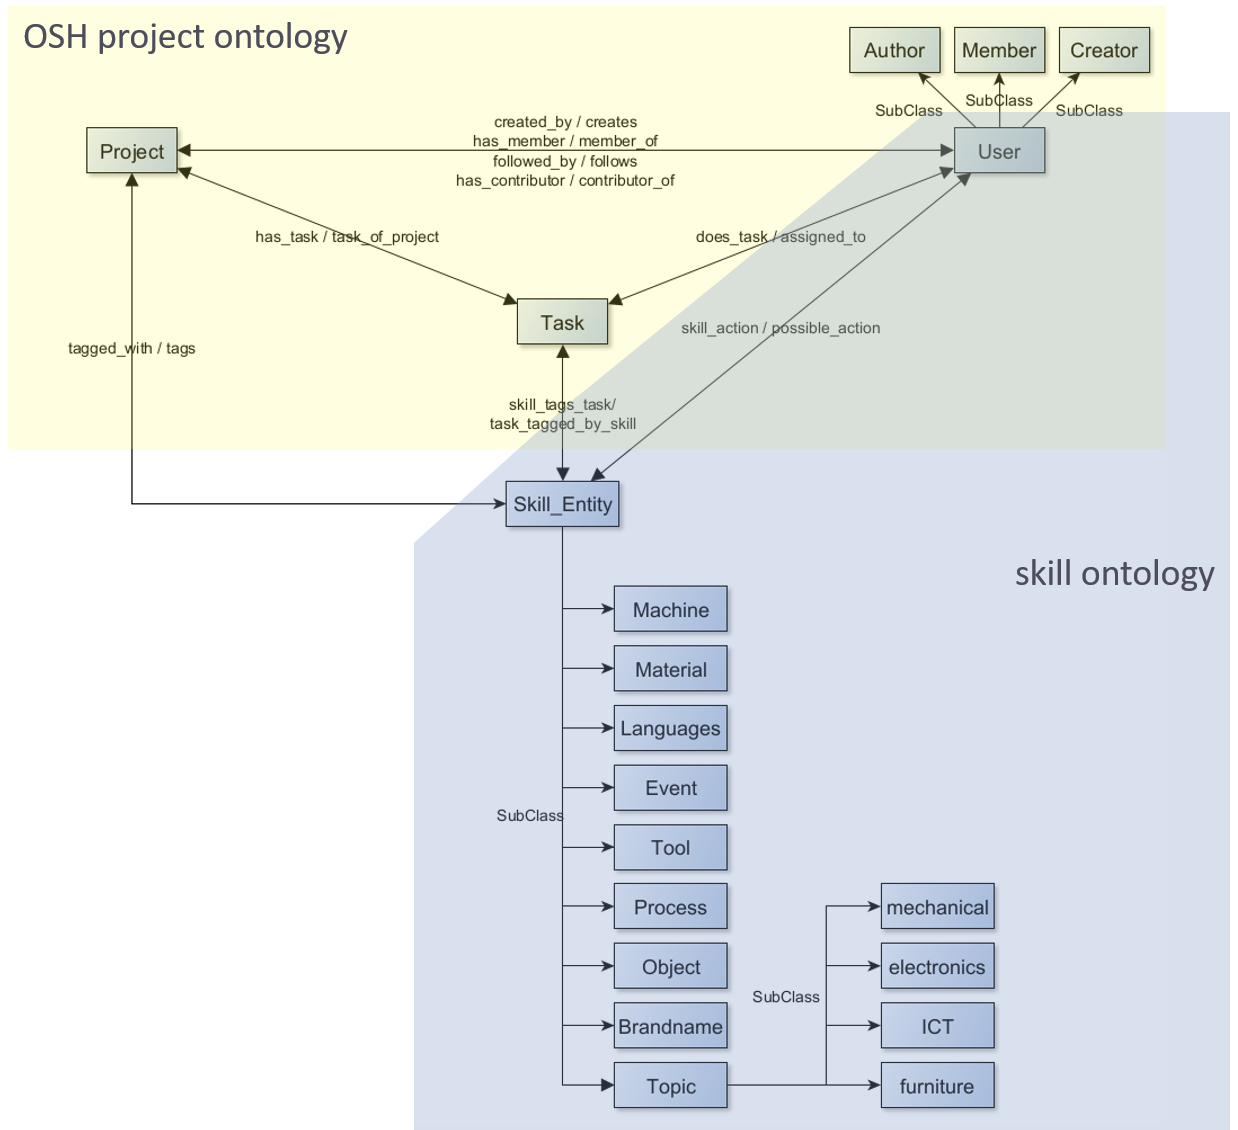
Based on the user flows a semantic network was developed. The net structure of the main classes of the semantic network for the application case are shown in Figure 1.
 |
|---|
| Figure 1: Ontology classes for the user flow application |
For customization reasons, the semantic consists of two ontologies referring to each other but are therefore replacable, if necessary. A third lightweight ontology imports the other two ontologies to use the vocabulary for instantiation, hence also can be adapted easily.
- OSH project ontology (on_OSHPDP.owl)
- This OWL ontology holds the architecture and semantic restrictions of the project landscape
- Main classes for the skillmatching case are "Person", "Project", "Task" and "Skill_Entity", that are related through properties.
- Property restrictions arise from the use cases before mentioned
- The OSHPD ontology imports the skill ontology
-
Skill ontology (on_skills.owl)
- This OWL ontology is based on the ESCO skill hierarchy
- The ESCO hierarchy was cropped to the topics of mechanics, electrics/electronics, furniture and cars/mobiliy.
- Afterwards a reclustering was done for ease of use purposes
- The skill ontology is still to be validated with OSH project data
-
Instantiation file (on_Instances.owl)
- This file holds needed project data of the individuals
- The file refers to and uses class and property expressions from the other two ontologies.
The following pre-requisites are recommended for the following sections:
- Basic knowledge about Ontology and semantics. An ontology is a concept used to model semantics (study of meaning, which enables developing parts of a language that can be understood and used commonly). A comprehensive overview can be found in (Guarino et al. 2009).
- Knowledge about the constitution of RDF and OWL graphs, and constants: RDF 1 and OWL 2,3 are used to model semantics. Both use triple patterns to create graphs interrelating resources and setting them into an interconnected network. An introduction into the topic is for example explained by (Pan et al. 2017).
- SPARQL knowledge: SPARQL 4,5,6 is a query language for RDF data using graph patterns to restrict query response results. The referenced links provide a comprehensive overview about the functionality of SPARQL.
- JSON and JSON pointer: (Pezoa et al. 2016) provides understandable insights for a quick introduction to the topic: JSON is based on the Java Script programming language and is used for web applications in order to send and retrieve API requests and responses. JSON pointer are both, a query language and a concept used for information retrieval from JSON documents via defined formatted strings, relating to a unique value in the JSON document.
- JAVA and JAVA APIs OWLAPI 7 and JENA 8 knowledge is helpful for developers who want to contribute to the demonstrator code. JENA API is an RDF open-source-framework for semantic networks. Most functionality is given for RDF graphs (like loading, serializing, saving, reasoning and querying) but functionality is also given to some extend on OWL based graphs. (Antoniou und van Harmelen 2009) indicate which expressions overlap in RDF and OWL and which ones shift the scope of RDF. For OWL ontologies the OWLAPI provides complete functionality.
- Since the repository is stored on GitHub, general knowledge about GitHub and Git is assumed, referring to the GitHub guides 9.
There is no specific installation needed. Depending on the use, the repository may have to be cloned. That is the case, when the mapping annotation properties in the ontology needs to be changed or if the query functionality provided in the demonstrator is used. For this general knowledge about Git is required. Furthermore, the structure of RDF and SPARQL should be known for the query use of the ontology. Interested developers, that need to change, adapt or improve the ontology, should be familiar with OWL and its extensions in contrast to RDF if aspiring reasoning or axiomizing. The following tables document the used software stack and the dependencies in software code.
| Software or Tool | Purpose |
|---|---|
| GitHub | Ontology hosting and demonstrator documentation |
| Protégé editor v5.5.0 | Ontology modeling |
| Eclipse IDE(v2020-03 R.0) with JRE1.8 | Coding and development of the demonstrator, including ontology files, JSON inputs and connection to GitHub repository |
| Dependency package | Purpose |
|---|---|
| ONTAPI v2.1.0 | JAVA package for ontology handling. It combines the JAVA ontology APIs OWL API and JENA API. This was used for parsing and serializing NT data during the instantiation process and for the SPARQL query. |
| OWLAPI v5.1.14 | Java package for handling OWL ontologies. This was used to extract the mapping annotation properties and to create the skill instances in the on_skills.owl |
| Hermit v1.3.8.510 | JAVA OWL Reasoner to assert inferences |
| javax.json v1.1.2 | JAVA package for JSON processing, especially providing the use of JSON pointers |
For changes in the mapping process, handling of the JAVA ontology APIs, OWL API and JENA API are used. They are JAVA implementations to build and handle semantic applications and provide functions to create, manipulate and serialize ontologies. To understand the functioning of the demonstrator, a short example is detailed below. It is oriented on the software stack shown in Table 4. Changing and further handling of the demonstrator is explained in the step-by-step examples section of the main document. For further developmental changes, refer to the flowcharts in the previous design notes section for an in-depth understanding. The following steps can be followed to run the demonstrator:
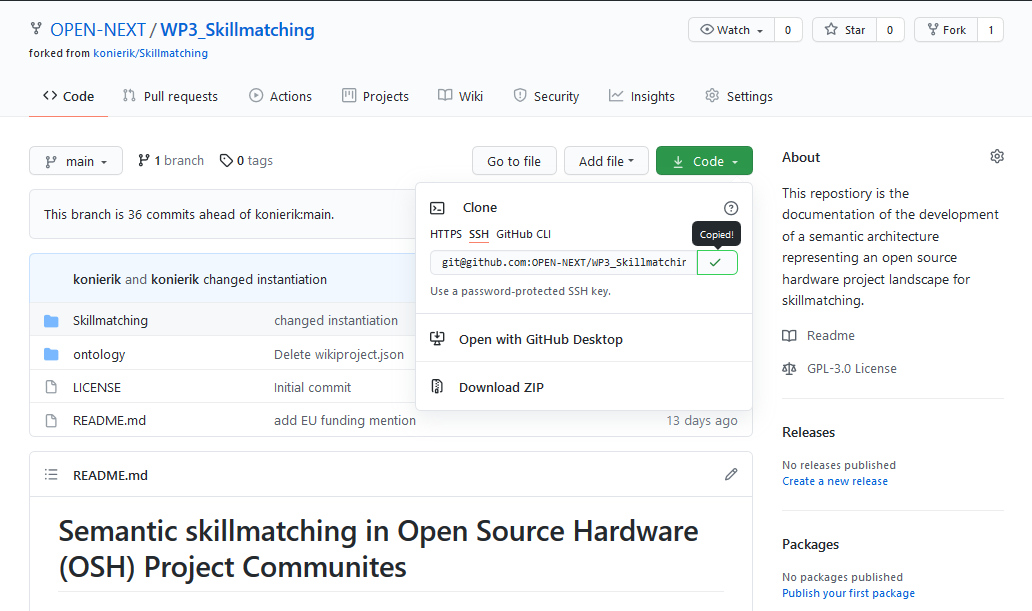
- Visit the GitHub repository: https://github.com/OPEN-NEXT/WP3_Skillmatching
- Copy the repository link
 |
|---|
| Figure 2: Coping the link of the GitHub repository page |
-
If not already done, an SSH key should be created to connect to the repository. Please refer to the Connecting to GitHub with SSH guide
-
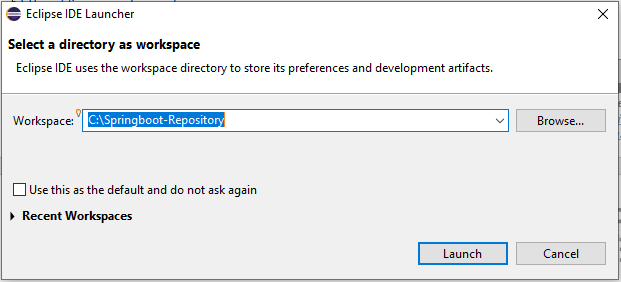
Open the Eclipse IDE and choose a workspace
 |
|---|
| Figure 3: Starting Eclipse and choosing a workspace |
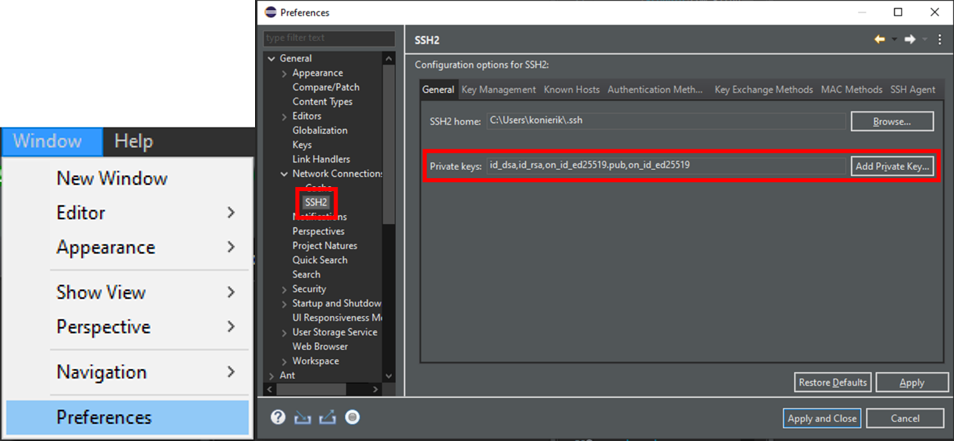
- Check if Eclipse uses the SSH key from GitHub
 |
|---|
| Figure 4: Setting the SSH2 key in the preferences |
The SSH keys used in Eclipse can be found under Window>Preferences>General>Network Connection>SSH2.
If the key is not found there, it has to be added from the location it was saved during step 5) of this section.
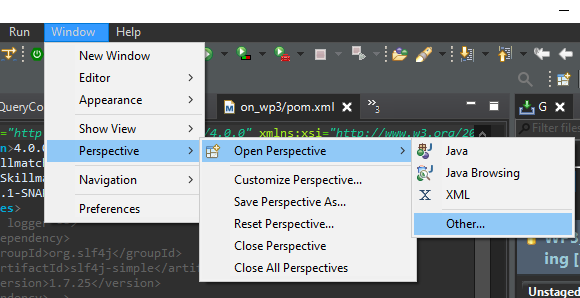
- Open the git perspective Following Windows>Perspective>Open Perspective>Other…
 |
|---|
| Figure 5: Open Git perspective in Eclipse (1/2) |
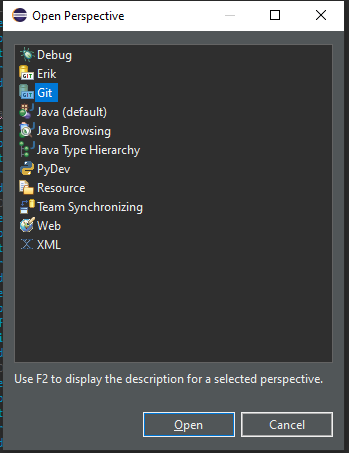
Select Git.
 |
|---|
| Figure 6: Open Git perspective in Eclipse (2/2) |
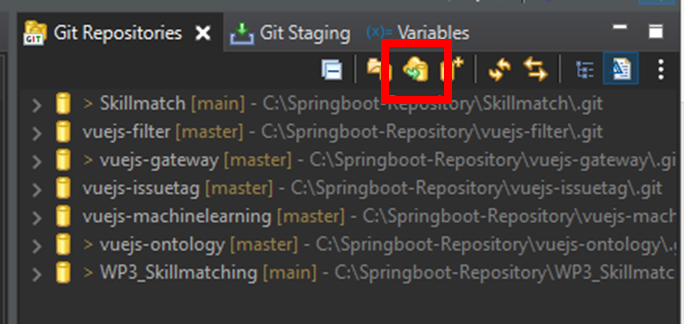
- Click on Clone a git repository in the Git Repositories tab.
 |
|---|
| Figure 7: Clone a Git repository from the Git repositories tab |
Afterwards the dialogue box for cloning a repository then opens.
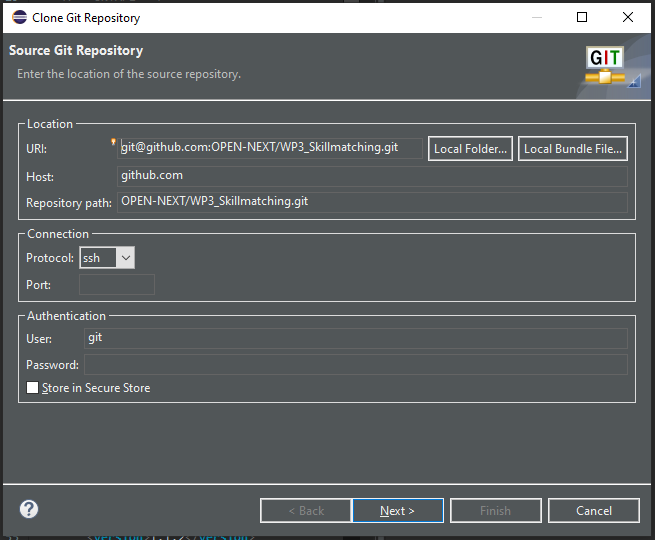
- Specify the repository to clone
After inserting the repository link into the URI field, the other fields should be filled automatically. If this does not happen, the fields have to be filled according to Figure 8.
 |
|---|
| Figure 8: Inserting the repository URI to clone |
Click Next
- Select the branch. The usual case is to clone the main branch.
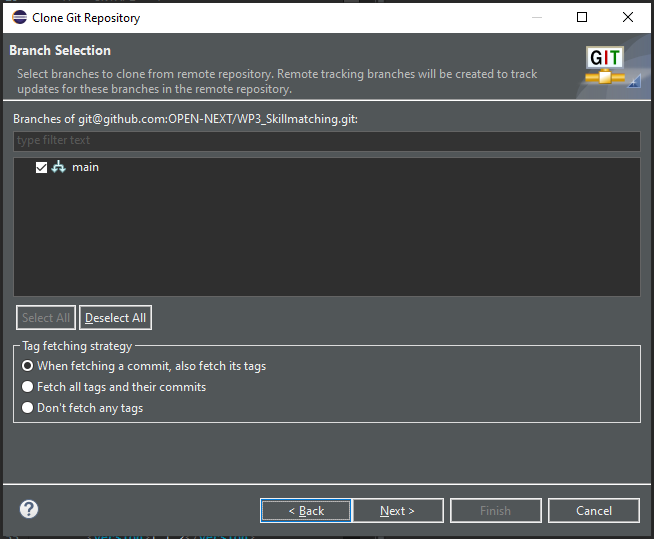 |
|---|
| Figure 9: Selection the branch to clone |
Click on Next.
- Choose the local destination of the Git repository by filling the Directory field.
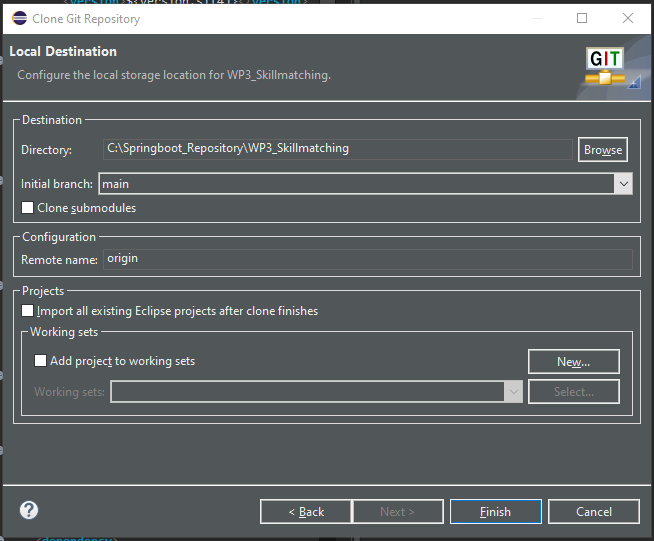 |
|---|
| Figure 10: Choosing a local directory for the git repository |
Click on Finish. The repository WP3_Skillmatching should now be displayed in the Git Repositories tab (cf. Figure 7).
Now a Maven project needs to be imported that integrates the Git.
- Import a Maven project Following File>Import>Existing Maven Projects
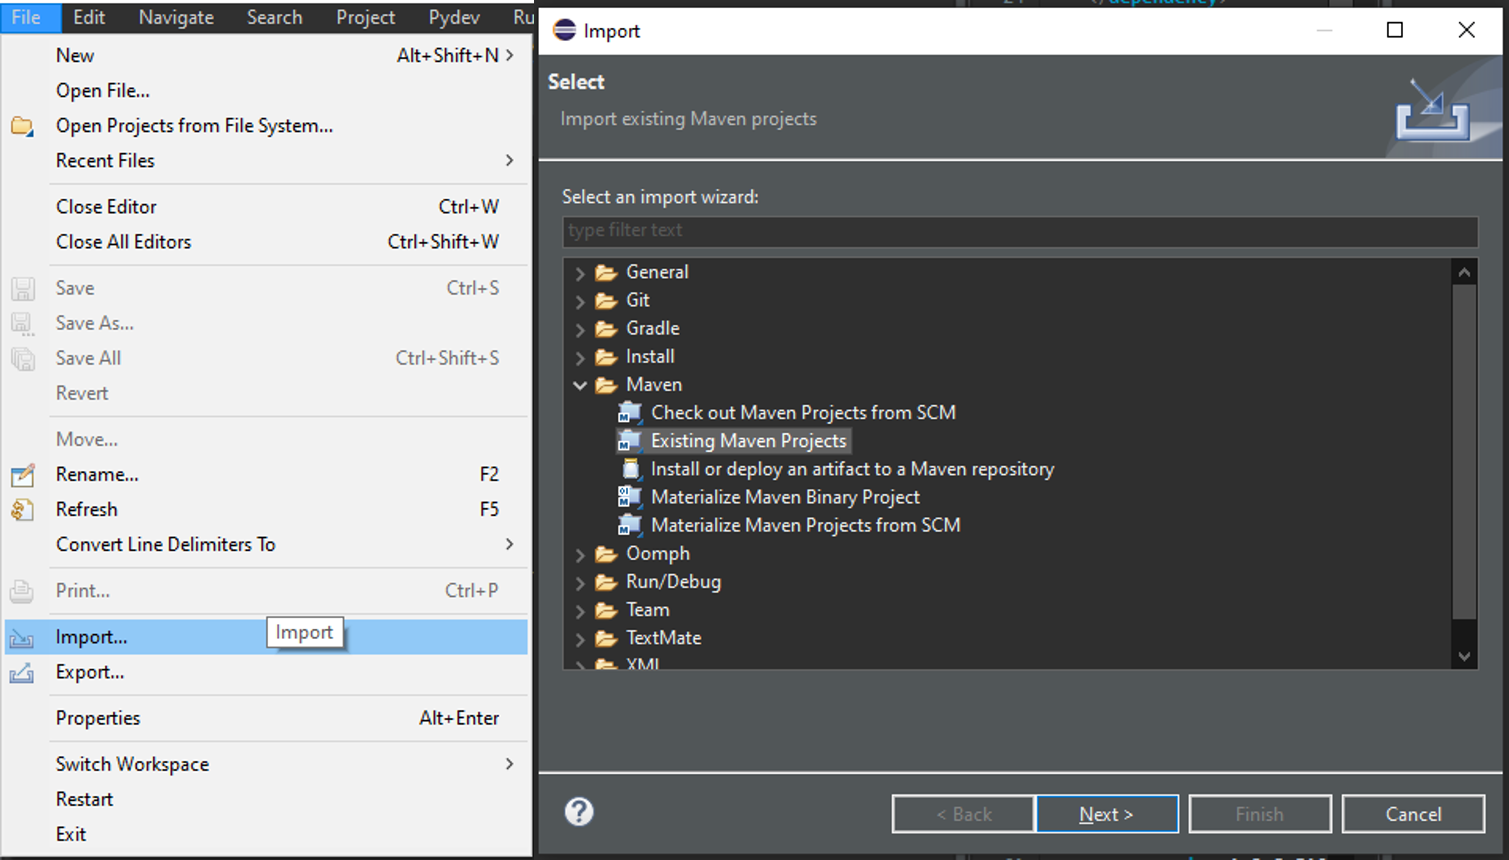 |
|---|
| Figure 11: Importing existing Maven project |
Choose the root directory with WP3_Skillmatching. For this manual another project WP3_Skillmatching_manual was created to be imported which is why it is displayed in the figures. For the use of the skill matching demonstrator the WP3_Skillmatching but has to be used.
 |
|---|
| Figure 12: Choosing root directory |
Click on Finish. The Maven project will appear in the Project Explorer tab.
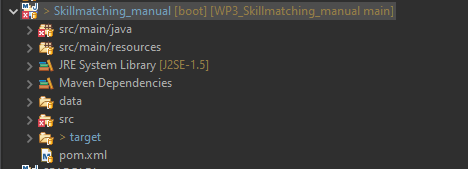 |
|---|
| Figure 13: Imported project in the project explorer tab |
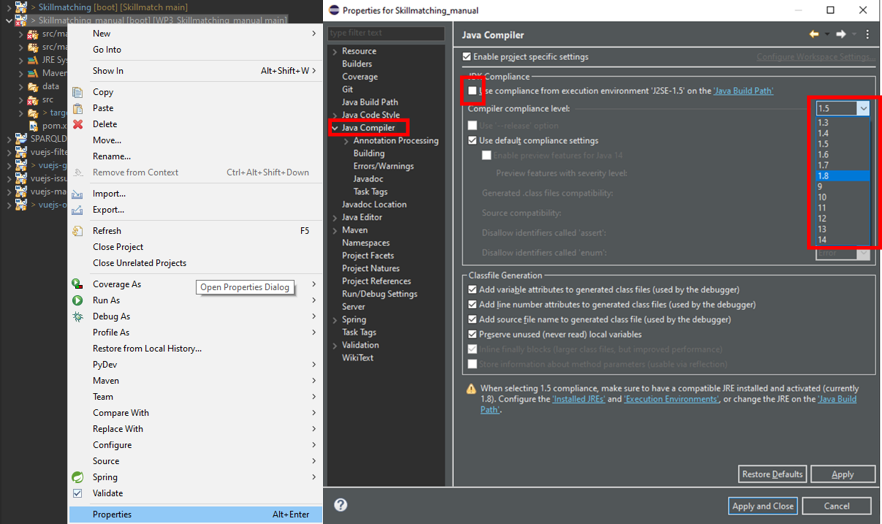
If there are some errors right away, most likely the JAVA compiler version has to be set to 1.8.
- Set JAVA Compiler Version This can be done in the properties of the project. (Right click on the project)
 |
|---|
| Figure 14: Setting JAVA Compiler level |
In the Java Compiler tab the Use compliance from execution environment ‘J2SE-X.X’ on the Java Build Path needs to be unchecked and the Compiler compliance level has to be set to 1.8.
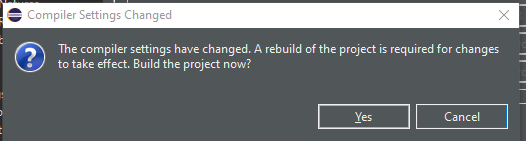
Click Apply and Close.
 |
|---|
| Figure 15: Agreeing to the project build |
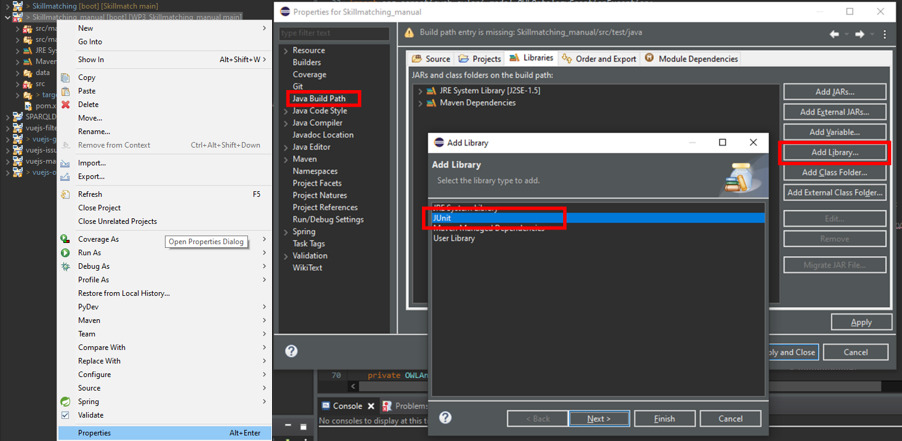
The rebuild of the project has to be accepted by clicking on Yes. If an error on the JUnit import statement occurs in the OntoModeler.java class, the library has to be added to the project.
 |
|---|
| Figure 16: JUnit import error |
The library can be added in the Java Build Path by right clicking the project and following Properties>Java Build Path>Libraries>Add Library >Junit >Junit5.
 |
|---|
| Figure 17: Adding JUnit library |
Click Next. Choose Junit5. Click Apply and Close.
Now the demonstrator is ready to use.
In this section classes from the code are mentioned and code lines are reffered to. To better understand the usage section it is advised here, to study the class diagram and the descriptions of the classes functions from the DESIGN NOTE section of the repository.
The demonstrator has two the main functions instantiation and querying. Each of their usages are described below:
i. Instantiation
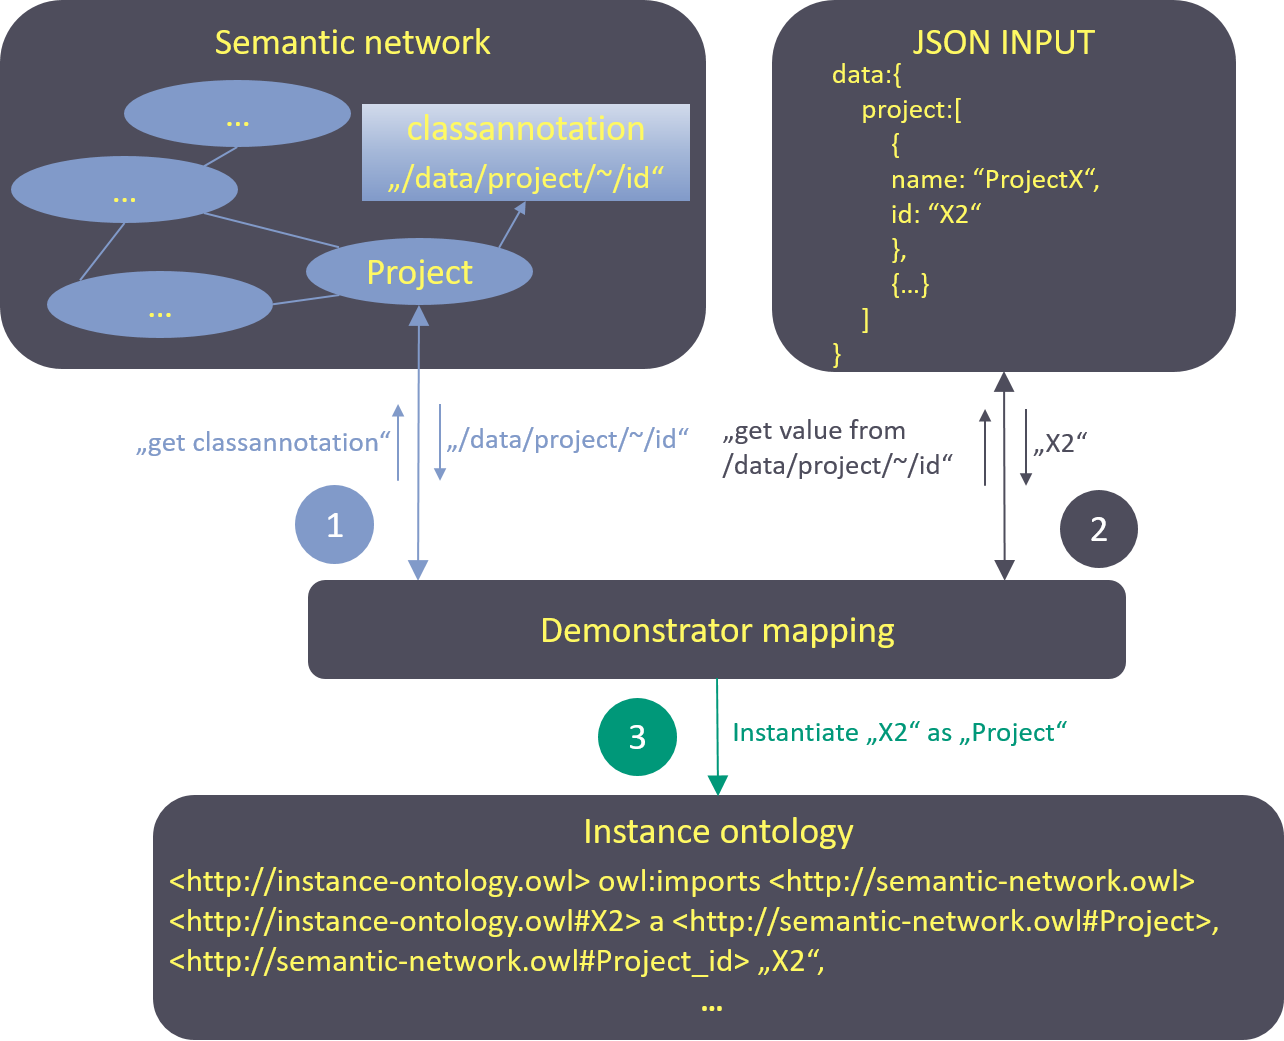
An ontology was created for the development goal of skill matching. To make it widely applicable, it was created without any instances. Project data from WIF was integrated via data mapping afterwards. This offers the advantage of simpler validation in case the data structure changes. If so, a new instantiation can simply be achieved by changing the mappings. The mapping approach is based on the idea of Méndez et al. and connects the ontology concepts with JSON formatted input data via annotation properties. That means, that the mapping information is directly stored in the ontology itself. The mapping process is visualized in Figure 18. Classes and properties in the semantic network are annotated with JSON pointers to the relating fields in the GraphQL API from WIF whose data was used for validation. For every mapping a new annotation property is created. This gives the possibility to use more than one data source from either the same or a different platform. During later instantiation it is possible to choose in the demonstrator code how the mapping should be used. For the user flow three different JSON data source files were created from query results of the WIF GraphQL API. This was done, so the first validation was not compromised by changes in the data structure during its constant progression and also because the user data had to be anonymized before used for instantiation. During the mapping process, the annotation with the JSON pointer is read out of the ontology and used to query the information in the JSON file that contains the input data. Afterwards those query results are instantiated based on which concept (class or property) was annotated in the first place. The instantiated individuals are saved in a separate file that uses the ontology vocabulary.
 |
|---|
| Figure 18: Mapping process |
ii. Querying
After instantiation, the semantic network can be queried. The query functions in the demonstrator use a query string as input, therefore individual queries are also possible, if implemented in the code. More on this is explained in the step-by-step example section for querying.
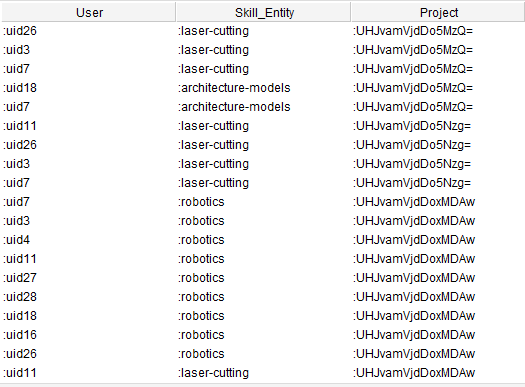
This sub-section provides an example of how a contributor and a project core team member can interact with the skill-matchmaking demonstrator. The contributor would like to update his/her profile and hence can select the suitable skills from a list of skills provided by querying the skill ontology. The project core team member can select the skills and tools required to fulfil a task in the project by querying the skill ontology in the backend. The current demonstrator is integrated with data from the Wikifactory platform and an example of these query results is shown below.
Direct user interaction with the ontology takes place in user flows 2 and 3. The query process of those will be described in detail. To query the instantiated ontology, the code in the demonstrator can be used or every ontology editor with query interface as well (one suggestion would be the Protégé editor with SPARQL plugin). The demonstrator provides queries based on the persona described. For the two user stories, the two queries are shown in the table below . For more elaborated insights on how to use SPARQL for queries, please refer to SPARQL 1.1 Query Language.
| UF No. | SPARQL Query |
|---|---|
| UF2 | SELECT ?User ?Skill_Entity ?Project WHERE{?User a oshpd:User; oshpd:User_id “uid113”; skills:skill_action ?Skill_Entity. ?Skill_Entity oshpd:tags ?Project. ?Project a oshpd:Project.} |
| UF3 | SELECT ?User ?Skill_Entity WHERE {?Skill_Entity skills:SkillEntity_name "3dprinting"; skills:possible_action ?User.} |
The query for UF2 looks for projects that are tagged with the same skills a user (here exemplary user uid113) provides.
The query for UF3 looks for all users that are connected to the 3dprinting Skill_Entity.
There is also a query class provided in the demonstrator with some example queries. To use those, you need to clone the repository or copy the source code of the Queries.java class in the query package. For other queries, those have to be written in strings and given as parameters into the query function. A flow charts in the annex section gives a better illustration of the process.
-
At the beginning the repository has to be cloned or downloaded. (This step depends on the environment used and should accordingly be identified on an individual basis. An example for the stated software stack is given in the Installation section.)
-
The Queries.java class from the query package provides exemplary queries according to the presented user stories that can be used. Otherwise new methods that return an individual query string can be added as well.
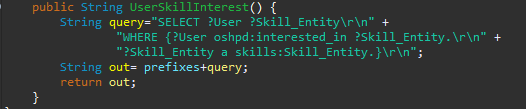
Figure 19: Method to create a query string for user interest -
If the ontologies were to be changed, the prefixes in the string variable prefixes of class Queries.java need to be changed accordingly as well.

Figure 20: Query prefixes Now the RunQuery.java class from the run package has to be specified.
-
The IRI of the ontology to query has to be set in the RunQuery.java class (cf. Figure 21)
-
The language of the model to open has to be specified in the openModel() method in RunQuery.java.

Figure 21: Setup for query execution using QueryExec.java class -
The query execution method of class QueryExec.java needs a SPARQL query as string parameter. For this, the query string generation methods of class Queries.java can be used.

Figure 22: Execution of query using the query generation method -
he generated result list can now further be processed, e.g. for frontend display.
To show the general function, an example of the use is given with the ontology editor Protégé which also provides a SPARQL plugin for query.
- Loading the ontology from its location. Here the repository location was used.
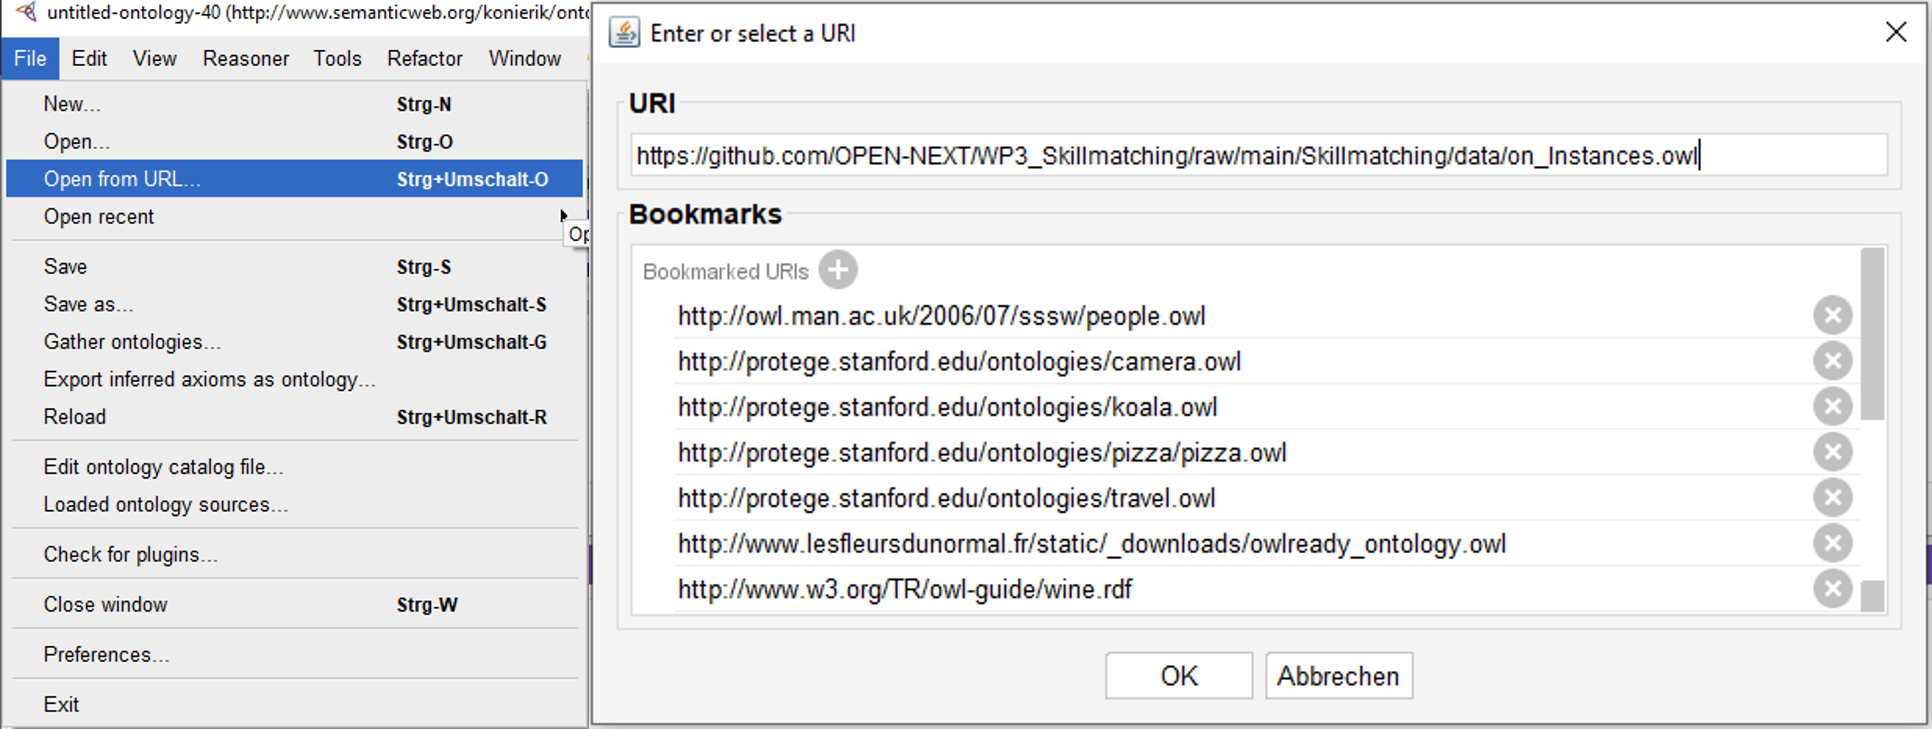
Figure 23: Load ontology from URI via Protégé editor - The editors SPARQL- /Query- interface needs to be opened.

Figure 24: SPARQL-plugin tab in Protégé editor - Adding prefixes and query string to the interface and execution of query. Figure 25 exemplary shows the UF2 query.

Figure 25: UF2 query with prefixes - Query results
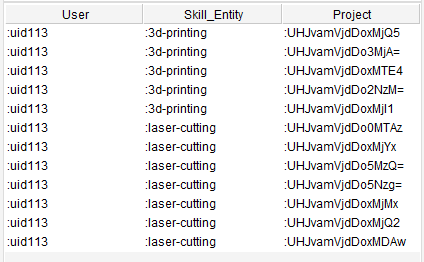
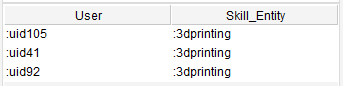
Figure 26: UF2 query results Figure 27: UF3 query results
The core ontology is open source and can be used by other platforms similar to WIF for carrying out skill based matchmaking. There are three different ways platforms can use and integrate the demonstrator, they are:
- Direct use – To reuse the ontology directly
- Customized use - To customize and use the ontology based on the platforms need
To connect the ontology to the platform data the next step is to carry out instantiation, followed by developing suitable queries to retrieve matchmaking information from the ontology. Each of these steps are explained in the following sub-sections.
- Direct use
To use the ontology for own data connection, e. g. for any other platform owner, it is possible just to refer to its location on the repository as namespace https://github.com/OPEN-NEXT/WP3_Skillmatching/raw/main/Skillmatching/data/on_Instances.owl and use the vocabulary for instantiation. The ontology is public and directly accessible from the repository.
- Customized use
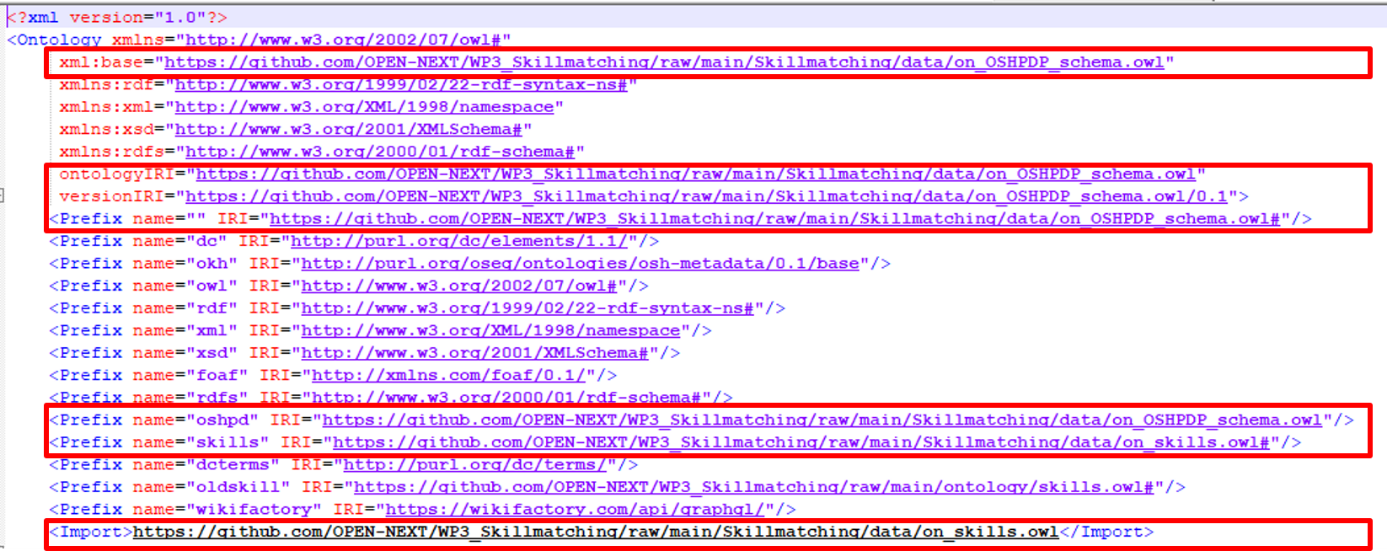
If it is desired to adapt or extend the ontology for individual use, e. g. if the data structure requires changes, the ontology can be downloaded from the repository and edited. For the ontology to be accessible, it is suggested to change the ontology namespaces in the ontology file (on_OSHPDP_schema.owl and on_skills.owl) from the repository namespace to the new ontology location (cf. Figure 28). This should also be considered for the import statement if it involves the respective ontologies (see bottom of Figure 28). Depending on which ontology is downloaded relating prefixes need to be changed as well (e. g. if the skills ontology is downloaded and adapted its prefix has to be changed in the OSHPDP ontology.
 |
|---|
| Figure 28: Repository namespaces in the ontology code |
So, for customized use, the following steps have to be considered/executed:
1. Downloading the ontology to new folder structure (local or server)
2. Changing the namespace, prefixes and import statement in the ontology file accordingly to fit the new file's location(s).
The mapping process is quite trivial. So, if there is very complicated data, that has to be mapped with rules and exceptions, an expansion based on the current mapping approach or another mapping process is recommended.
- Cloning or downloading the repository
- Opening the mapping ontology file on_OSHPDP.owl in the data folder of the repository (e. g. with a text editor).
- Adding custom data mapping:
To instantiate own JSON data, e. g. in case for a platform owner, that wants to connect his data, a change of the respective annotation is necessary. The figures below show a class-mapping declaration (Figure 29) and definition (Figure 30) for the class Project in the ontology.
 |
 |
|---|---|
| Figure 29: Declaration of annotation property in an owl file | Figure 30: Mapping annotation for class "Project" with pointer string in JSON input file |
For the given example, the mapping is called "wif_project_2_cmap". The IRI section specifies which concept of the ontology is annotated (here the class Project) and the literal section includes a string of the JSON pointer, i. e. values for instances of the class Project can be found in the field “/data/projects/result/edges/~/node/id” in the corresponding input file. The “~” marks an array in the JSON data. Such markers will be automatically resolved into all existing entries of the array in the JSON file.
For every new annotation property, a declaration axiom (Figure 29) and a definition (Figure 30) has to be added to the ontology file. That applies to classes, object properties and data properties in the ontology. Here for every concept “touched” by the instantiation, there has to be a mapping to JSON data. That means, for example to map a data property, there has to be a mapping annotation property to the data property itself but there also has to be a mapping annotation property to the relating domain class of the data property. To stay in the example: to map a Projects name, there has to be a mapping annotation property to the data property Project_name and a mapping annotation property to the corresponding domain class Project as well. Same logic is applied to object properties, but here are three mapping annotation properties are necessary, each one to the domain and range classes and one to the object property with a pointer to the specific individual.
If the input data has multiple possible pointers for a concept in the ontology, extra mapping annotation properties can be created. E.g. the shown annotation is the second class-mapping for the concept Project, because in the input data were additional project data that could be reached with other pointers.
Now it is time to prepare the main method in the CreateInstances.java class in the code for instantiation:
-
If the skill ontology or the OSHPDP ontology were changed, the corresponding string variables skillIRI or mappingIRI needs to be changed as well.

Figure 31: skillIRI and mappingIRI variables in CreateInstances.java -
The iri of the instantiated ontology to be created has to be specified. If public access to the instances is desired, the later location should be taken as namespace (like it is done in Figure 32)

Figure 32: instanceIRI variable in CreateInstances.java -
The directory variable needs to be changed according to where the cloned/downloaded project is located. Add the path right away until the data folder of the project. (So to say that just the files name and extension have to be added in later use)

Figure 33: directory variable in CreateInstances.java -
For each JSON input file, a JSONReader object has to be instantiated and the location of the files needs to be set. At best they were already copied into the projects folder structure.
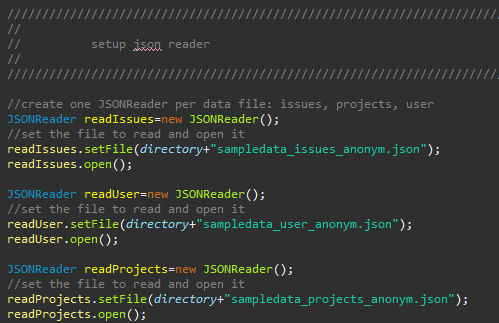
Figure 34: Setting up JSONReader objects for the JSON input in CreateInstances.java -
This step has to be done for every input source that should be instantiated: The mappings that should be instantiated need to be set. The general case should be, that per mapping annotation there has to be instantiated a class mapping, object property mapping and data property mapping. Not all mappings from the ontology have to be instantiated if not necessary. The figure below shows the instantiation of each five class-, object property- and data property mappings that use the source sampledata_issues_anonym.json from the JSONReader readIssues (cf. Figure 34).
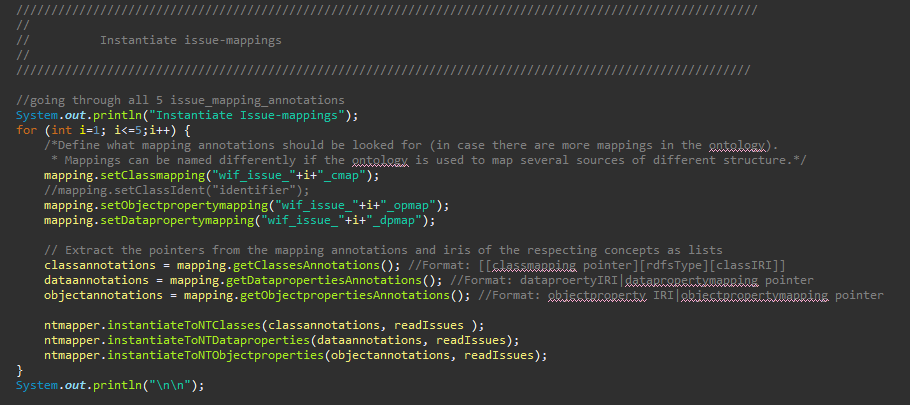
Figure 35: Instantiation of mapping annotations in CreateInstances.java
In the given code of the demonstrator were three JSON input files. To instantiate all information of those, several mappings each were necessary, due to the repeated occurrence of the same classes in the same file. This is represented by the loop in Figure 35.
-
For each mapping annotation to be instantiated an ArrayList<ArrayList> needs to be added in the code (Figure 36). Those have then to be filled with the corresponding annotations using the get..Annotations() methods of the OntoModeler mapping (cf. Figure 35).

Figure 36: Lists to save the annotation properties in CreateInstances.java -
The NT-file output location and name needs to be set. The instances are firstly stored in NT-format and afterwards converted to RDF language.

Figure 37: Set NT output in CreateInstance.java -
At the end the ontology location for saving in CreateInstances.java has to be set.

Figure 38: Setting ontology saving location in CreateInstances.java -
The last step is to run the CreateInstances.java class

Figure 39: Running the CreateInstances.java class
Optional: If statements in the instantiation should be inferred, the next optional steps are necessary:
-
Bevor the reasoning can start, the intantiated ontology has to be publicly provided, so it can be loaded from its namespace.
-
The variables instanceIRI and directory in the InferenceOntology.java class need to be set. Setting the instanceIRI variable to the location the instantiated ontology is provided and the directory variable to the local location the new inferred ontology should be saved to.
 |
|---|
| Figure 40: Setting variables in the InferenceOntology.java class |
- Start the main() method from the InferenceOntology.java class
The reasoner needs some time to assert the inferences depending on the amount of data that should be instantiated. The instantiation process has ended, when the ontology saving statement (Figure 41) appears on the console.
 |
|---|
| Figure 41: Saving statement for the ontology on the console |
The query process for a platform owner works the same way as for contributors. The queries just vary based on intended results. An example for a platform owner is given below. The query answers the question, what projects can be suggested for users to participate and vice versa.
| SPARQL Query |
|---|
| SELECT ?User ?Skill_Entity ?Project WHERE {?Skill_Entity a skills:Skill_Entity; oshpd:interest_of ?User; oshpd:tags ?Project. ?Project a oshpd:Project.} |
 |
|---|
| Figure 42: Exemplary query results |
The following section gives insights how the code is constituted and how the methods are handled to instantiate and query the ontology.
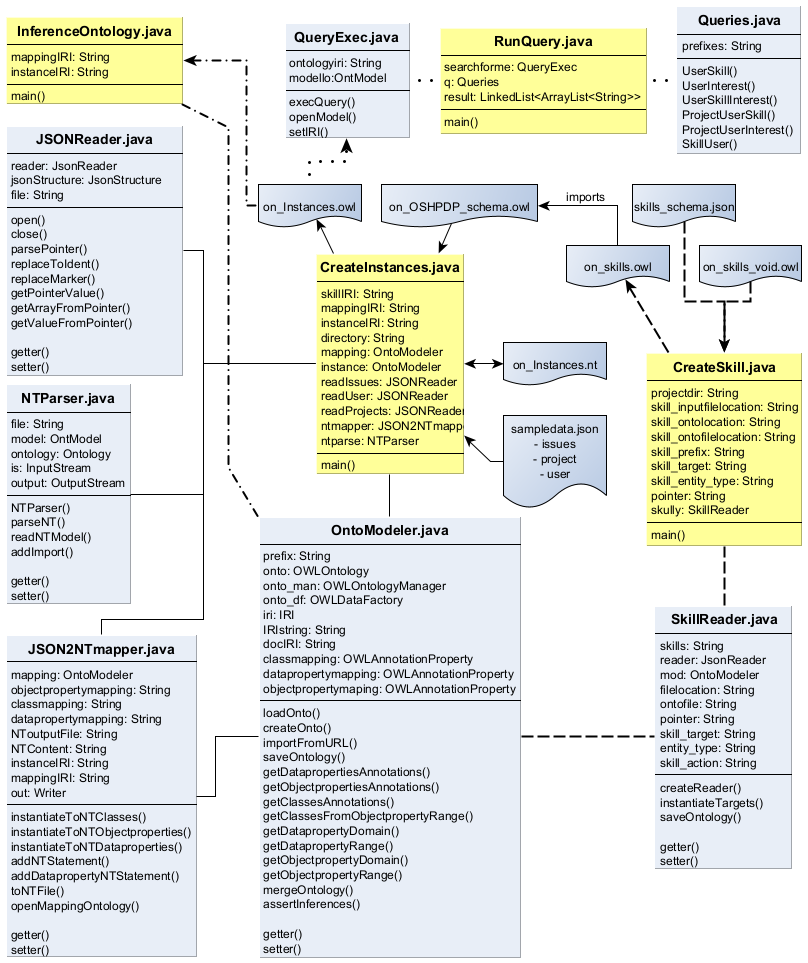 |
|---|
| Figure 43: Class diagram |
OntoModeler.java
The OntoModeler.java class is used to create, load and save, handle and serialize OWL ontologies and ontology files. The main functionality in the demonstrator is, besides loading and saving the ontologies, to read out the mappings of the OSH project ontology, get information about the relating concepts (e. g. get the domain class of an object property) and to instantiate information from the JSON input files (this happens mainly in case of skill data instantiation). Also it is used for reasoning during the instantiation of the project data and saving the instances ontology.
SkillReader.java
This class provides functionality to read skill information from the provided JSON input file (skills_schema.json). It uses a JSON-pointer to specify the location of desired data in the JSON file and creates a JSON array. Defined key attributes are used to read out values from this array. Afterwards, the predefined skill schema (on_skills_void.owl) is loaded with the help of the OntoModeler.java class and the resulting values are instantiated as OWL ontology (on_skills.owl) and saved.
CreateSkill.java
This class holds the main() method for the skill instantiation process and coordinates it by passing parameters and calling functions of the SkillReader.java and OntoModeler.java classes. The parameters required for skill instantiation are initiated here in the beginning.
JSONReader.java
The JSONReader.java class holds functionality to extract data from the JSON formatted inputs over JSON pointers. If pointers contain array markers, there is functionality to parse those arrays into its entries and coordinates the connection of value information to its respective entry in the array.
JSON2NTmapper.java
This class uses the results of JSON data extraction from the combination of JSONReader.java and OntoModeler.java methods and converts them into a NT-file. N-Triples (NT) is a plain text format for RDF graphs and serves for the instantiation as intermediate format from JSON to OWL translation.
NTParser.java
This class loads an NT-file (in the instantiation case provided by methods from JSON2NTmapper.java class) and provides a methods to enrich the file, e.g. with a statement to import the vocabulary of another ontology or setting different prefixes to the ontology. Also there are functions to convert the NT-file to another RDF based format.
CreateInstances.java
This class contains the main() method for the instantiation of project data. It provides variables for prerequisite input files and their locations. Connecting the OntoModeler.java, JSONReader.java, JSON2NTmapper.java and NTParser.java classes, it coordinates the calling of methods and handover of parameters and results of methods during instantiation.
InferenceOntology.java
This class provides reasoning functionality, if it is necessary. It contains the main() method for reasoning and inferencing an instantiated ontology and provides a variable for the ontology IRI to load it and an output variable to save the ontology after reasoning. To load the ontology, assert inferences and save the ontology afterwards, the methods of the OntoModeler.java class are used.
Queries.java
This class provides methods to return SPARQL query strings based on the described user flows.
QueryExec.java
The QueryExec.java class connects to an ontology and executes queries on it. In case of the demonstrators, the instantiated project data (on_Instances.owl) is queried with the query strings provided by the Queries.java class.
RunQuery.java
This class holds the main() method for the querying process and uses SPARQL queries from the Queries.java class passing it to the QueryExec.java class.
The following diagrams visually facilitate the function of the main processes instantiation and querying. The instantiation process works differently for the skill instantiation and the project data instantiation. Both are shown below, for skill instantiation in Figure 44 and for the instantiation of the project data in Figure 45. The flow charts are provided in a sequential structure, indicated by the process arrows. At the same time the different classes used are displayed in a swim lane fashion, indicated by lines without arrows. Before starting the instantiation process, it is possible to change needed variables, shown in the manual input section of the flow charts. For the user flows of the project, all variables are set and the instantiation methods were executed resulting in a fully instantiated ontology, which is ready to be queried.
The sequence for the instantiation process of the ontology in Figure 45 is shortened to a level of general understanding. To get a more elaborate insight of the explicit code function, the repository also provides a complete flowchart of all functions used, necessary to understand it. However, a detailed presentation of self-explanatory methods has been omitted (e.g. setter methods). Additionally, the methods are mostly described in the commented code as well.
The skill instantiation is additionally presented shortly in writing. The CreateSkill.java class holds the main method and is responsible for the process flow.
At the beginning an instance of the SkillReader.java class is created and the location for the JSON input file is given. This input file is read by a reader that now holds all information needed. Now the different pointers are set:
- The pointer variable indicates which section of the input file is necessary for the instantiation
- The skill target variable indicates which values are instantiated as individuals (that counts e. g. for 3d-printing)
- The skill entity type variable shows how to classify a relating skill target variable (e. g. 3d-printing is an individual of the skill entity type class Process)
After setting all variables, the instantiation process begins (instantiateTargets()):
- A pointer is created from the pointer string variable
- If the pointer exists, the void skill ontology is loaded to be instantiated.
- The data array from the pointer variable is read
- For each entry in the array a skill target and skill entity type are read and instantiated. A skill target variable is instantiated as individual of the class indicated by the relating skill entity type.
- After instantiation of all skill targets, the instantiated ontology is saved and needs to be stored manually in the public project repository.
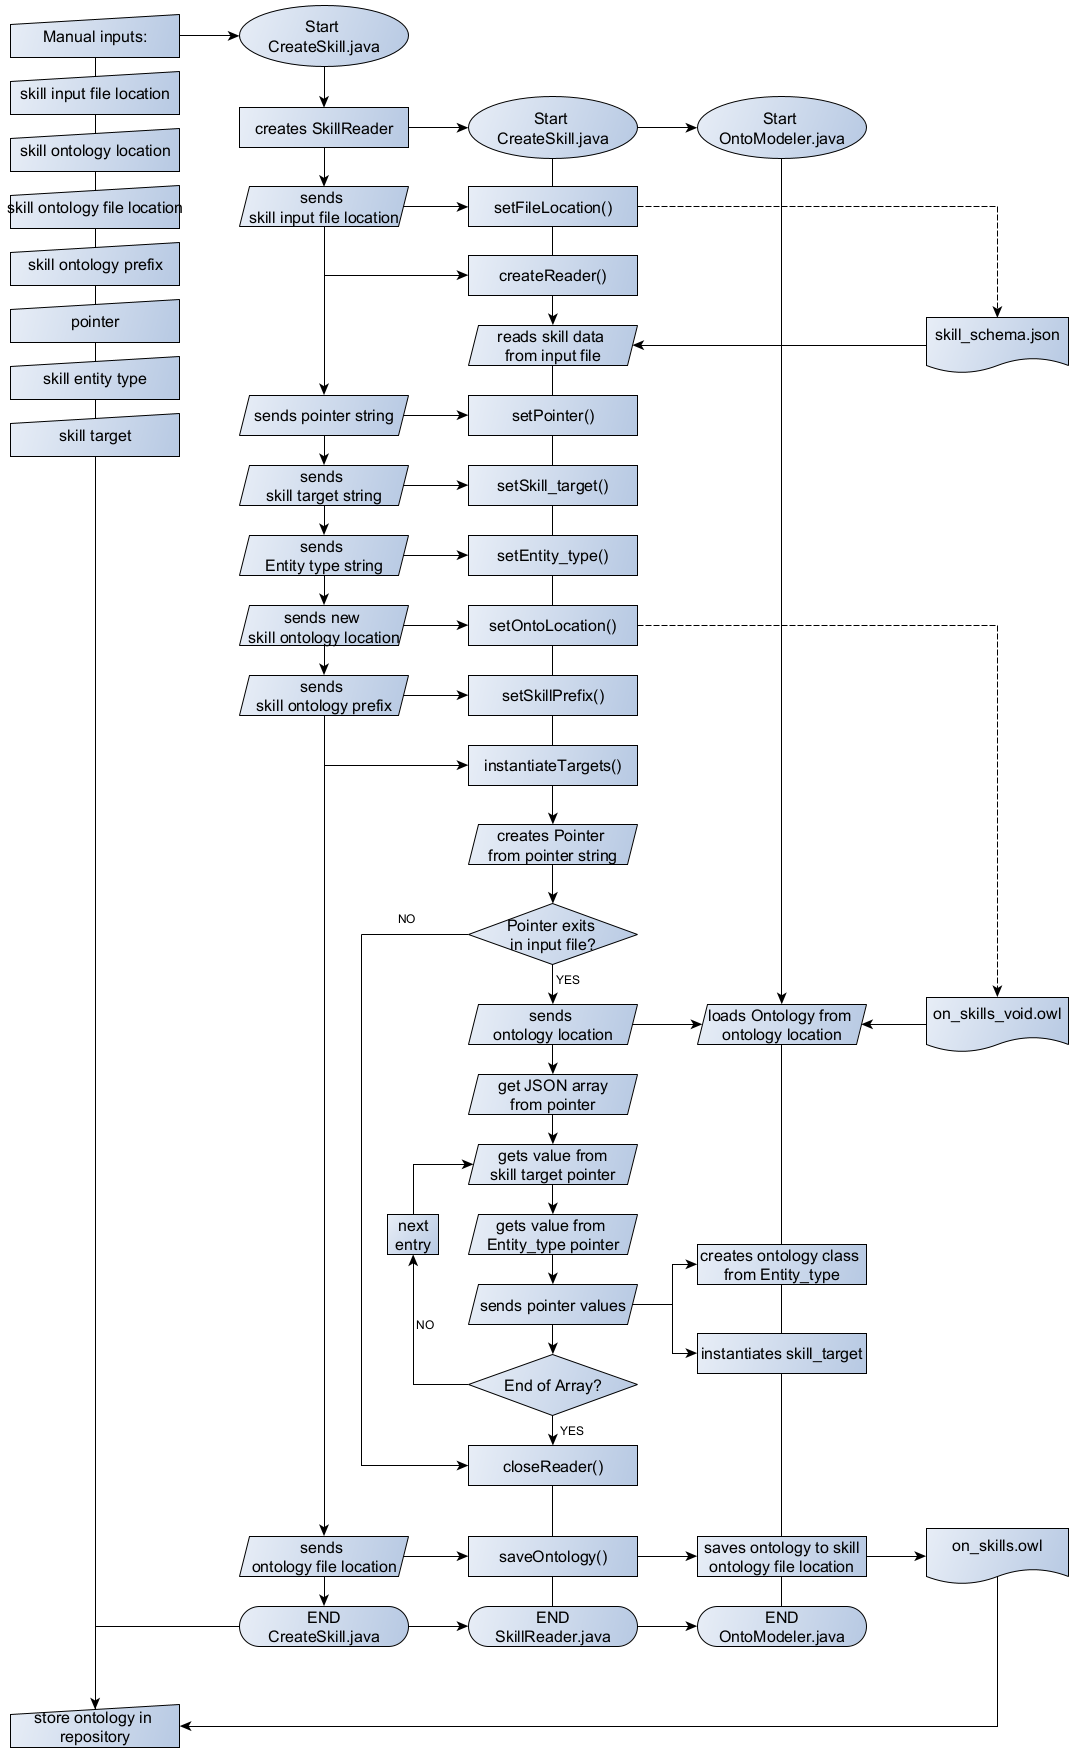 |
|---|
| Figure 44: Skill instantiation flow |
The instantiation process will be shortly described divided into three main parts.
- Getting the mapping annotation properties from the OSH project ontology
This parts relates in the flow chart to the section between the steps “Start CreateInstance.java” and “END OntoModeler.java”. After setting the manual inputs, the instantiation process starts with the initialization of an OntoModeler.java object in the CreateInstances.java class. After that the following short steps take place:
- The IRI of the mapping ontology is set and the ontology file is loaded
- The mapping ontology is merged with the ontology find behind the skill ontology IRI (here the skill ontology)
- The mapping annotations are set, which should be searched in the following process. (setClassmapping(), setOPmapping() and setDPmapping())
After setting what mapping annotations should be searched, the mapping annotations of every class, object property and data property are read out of the ontology and the results are saved into lists. Each list contains of three arrays and is arranged as follows for each of the subsequent cases:
- Class mapping annotations: The first array contains all mapping annotation pointers for the individuals to be instantiated. The second array simply contains an “rdf:type” statement and the third array holds the respective class IRI of the instances class.
- Object property annotations: The first array contains the pointers of the domain class from the respective object properties, which´s IRIs are stored in the second array. The third array stores the object property annotation pointers of the range classes from the respective object properties.
- Data property annotations: The first array contains the pointers for the individuals to be instantiated. The second array contains the data property IRIs and the third array contains the respective data property annotation pointers.
- Creating an NT file from the mapping annotation pointers
The explanations in this part refer to the steps from “Start JSONReader.java” to “END JSON2NTMapper.java”. After the initialization of a JSONReader.java object, the file location of the JSON inputs is set and the file is opened. A JSON2NTmapper.java object is created and the mapping ontology IRI, to load the existing OSH project ontology, and the instance IRI, in which the new instances are to be stored, are set. With the JSONReader.java object annotation pointers from the lists of class- , object property- and data property annotations created in the first step are replaced with their corresponding values. With the values and the IRIs from the ontologies, NT statements are created and saved as NT file.
- Converting the NT file into an RDF format
This section concentrates on steps between “Start NTParser.java” and “END NTParser.java”. When created, the NTParser.java creates an ontology model that will be added with the further described information. Necessary prefixes are added to the ontology model with the setPrefix() method. The readNTModel() method reads the NT file with instances information from its location that was handed over to the constructor at creation. After setting the ontology IRI, adding necessary statements to import concepts and vocabulary from other ontologies and setting the output file location, the ontology model is saved in OWL format.
Afterwards, the ontology file needs to be manually stored in the public project repository.
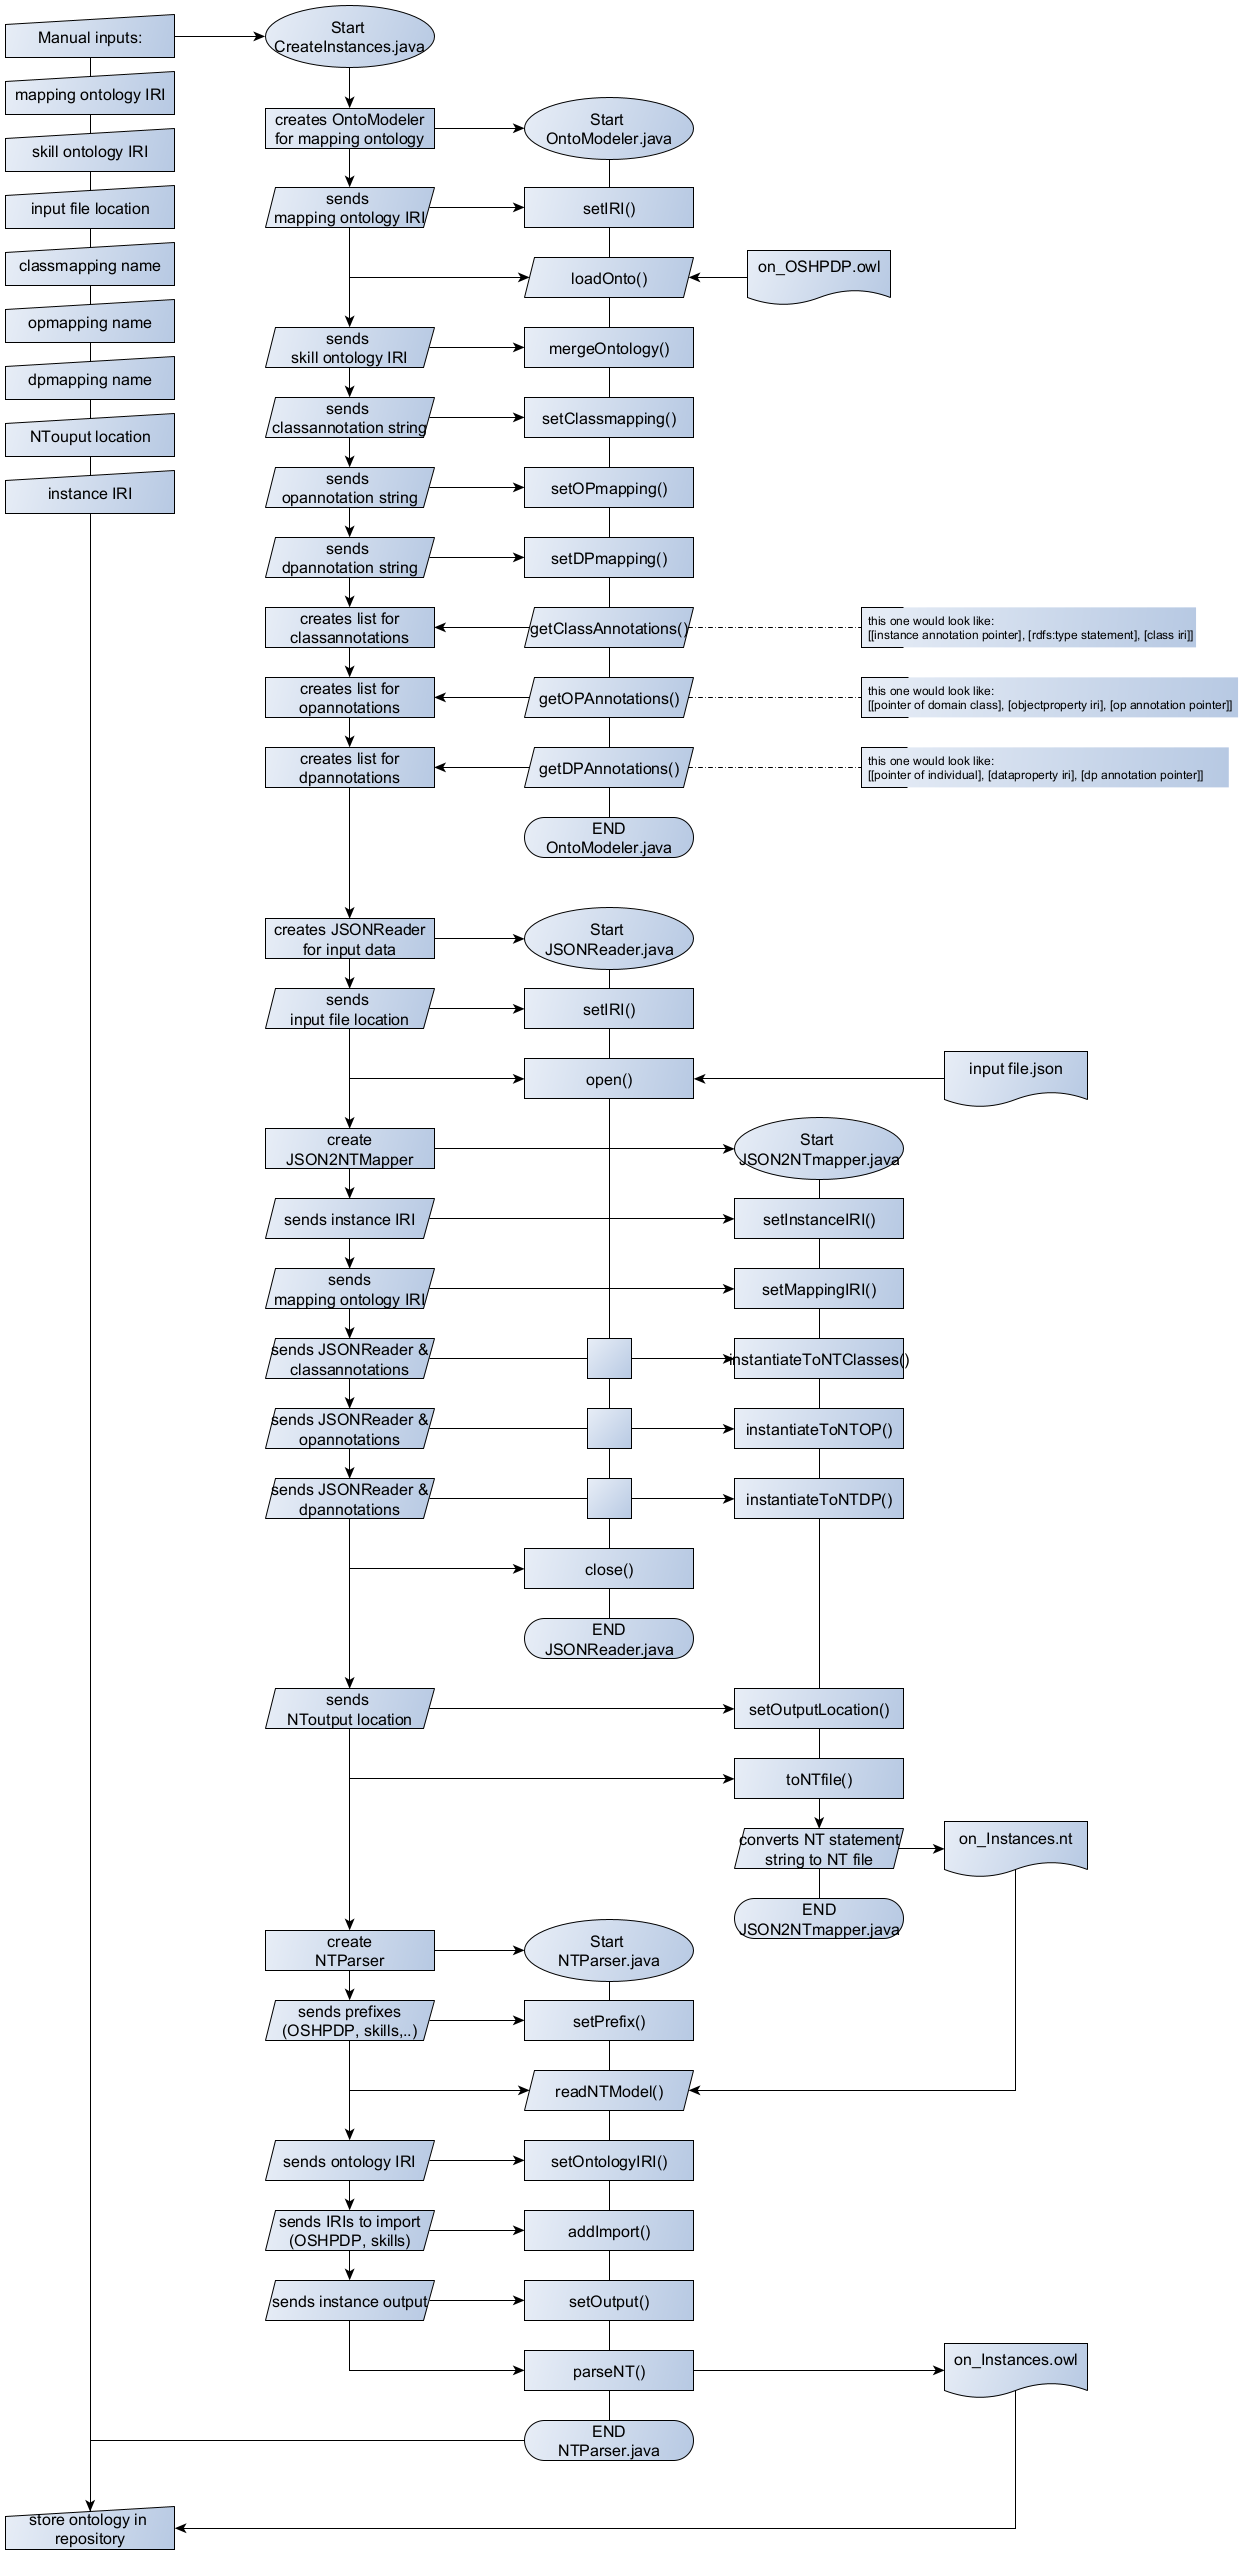 |
|---|
| Figure 45: Instantiation flow |
The reasoning process is shown in Figure 46. After setting the manual inputs, an OntoModeler.java object is initialized that loads the instance ontology from its IRI. The assertInferences() method creates a reasoner, that precomputes inferences, creating new axioms for the ontology. A loop runs through the set of new axiom, adds it to the ontology and saves it. Afterwards the ontology with asserted inferences has to be manually stored to the public project repository.
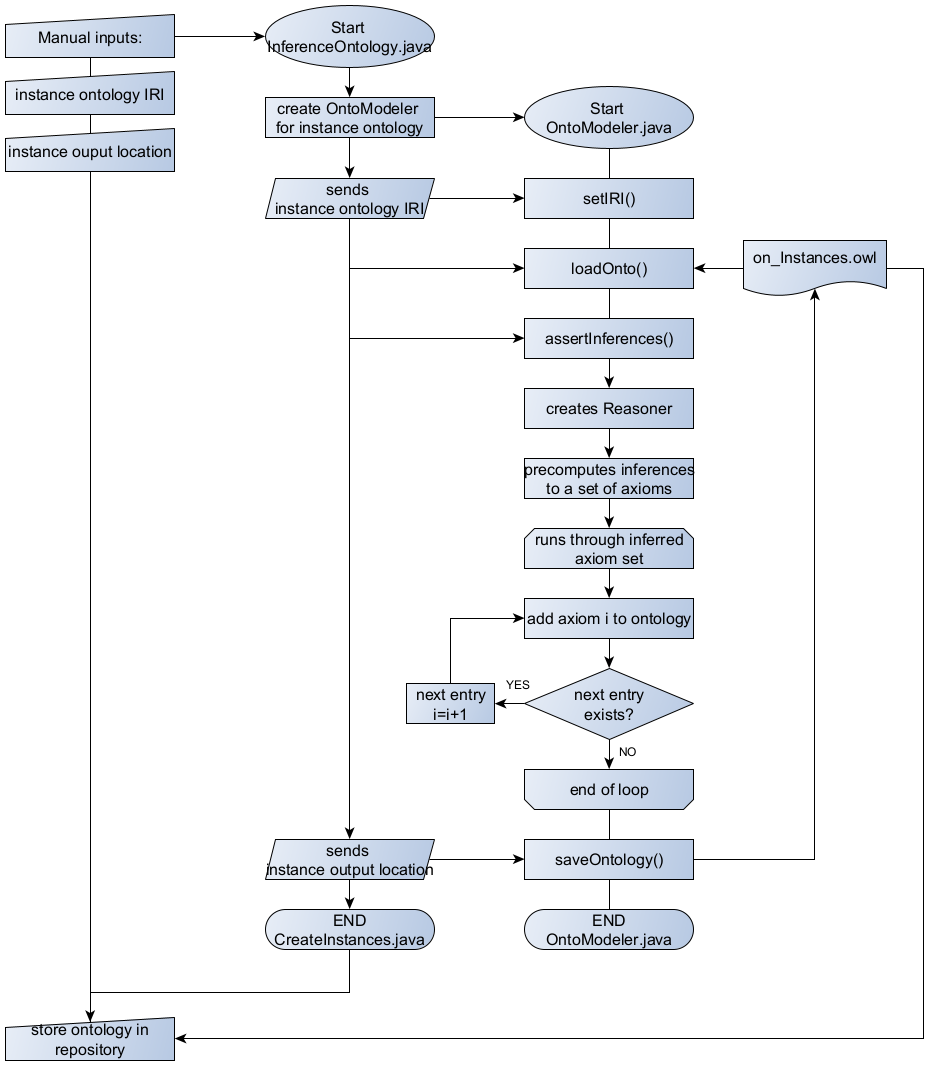 |
|---|
| Figure 46: Reasoning process flow |
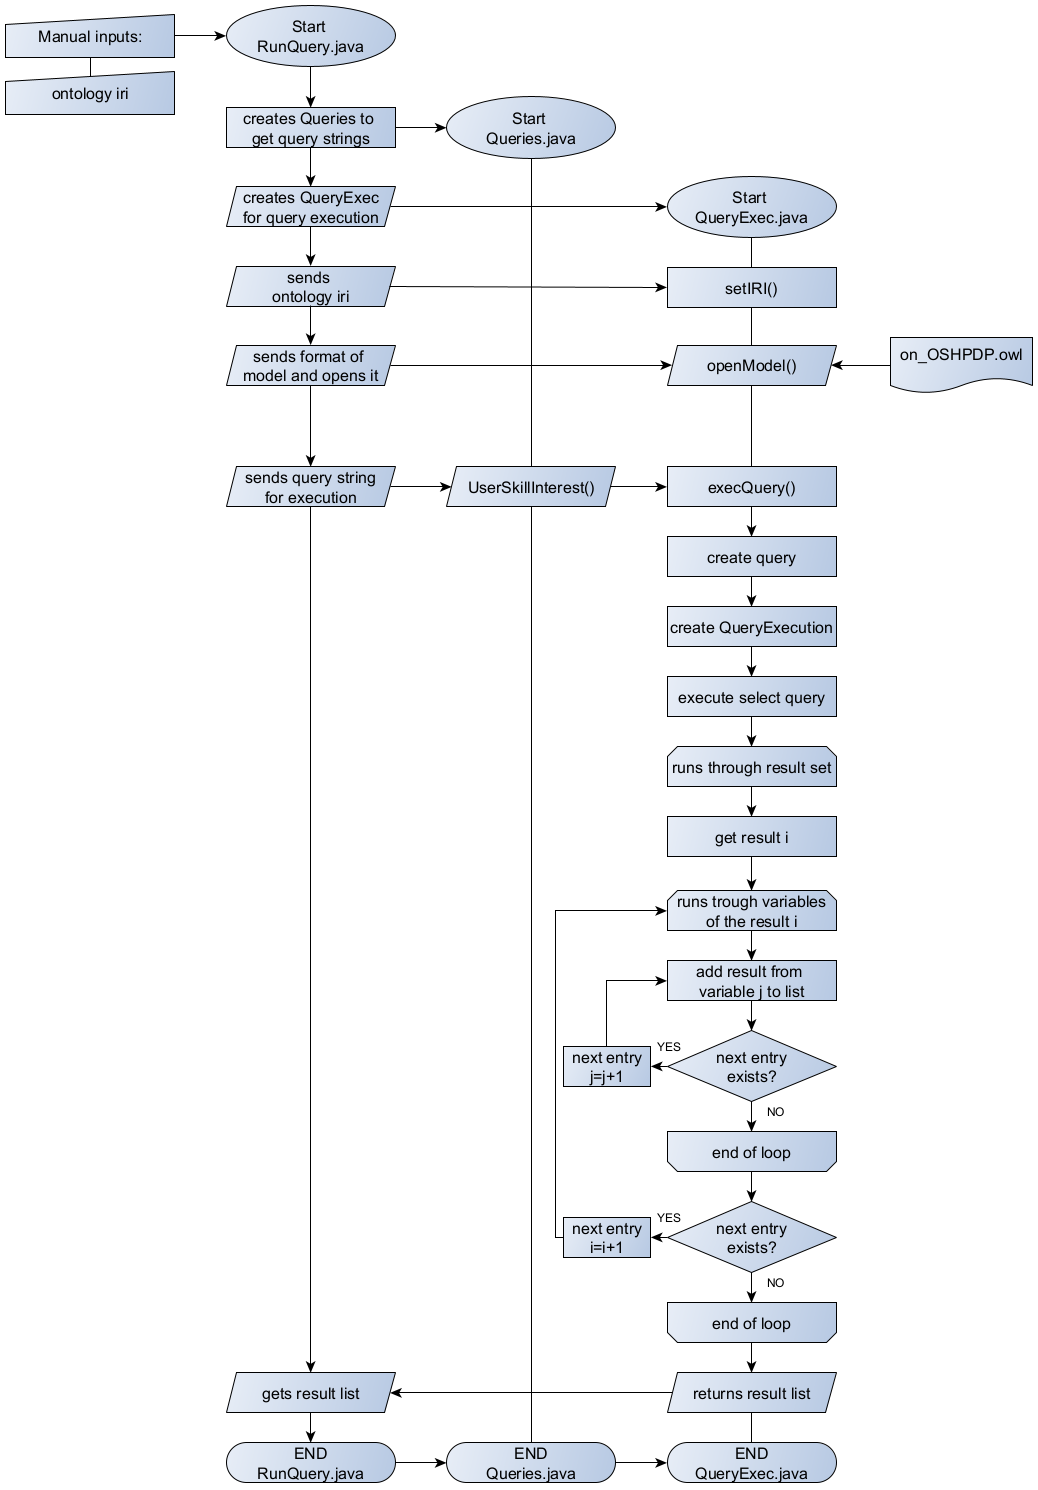
The query execution flow is shown in Figure 47 and starts with the RunQueries.java. In this class the ontology IRI to be loaded and queried is provided as string variable. After initiation of a Queries.java and a QueryExec.java object, the ontology IRI is set for the query execution and the ontology model is loaded. The Queries.java class provides methods to return query strings for the execution on the ontology. In Figure 47 the example of the UserSkillInterest() query generation method is shown in the process. This can be replaced with other query generation methods from the Queries.java class. The generated query string is handed over to the query execution method of the QueryExec.java class. To execute the query a Query and a QueryExecution type variable are created and the result set from the query is generated. The result set is run through and the results for every variable is saved into a result list. The number of variables depends on the number of variables in SELECT clause of the query. At the end the result list is post-processed to match a table like layout.
 |
|---|
| Figure 47: Flowchart Query execution |